Introduction
Learning to play country electric guitar requires a lot of dedication and practice, and one crucial aspect of mastering this genre is understanding fingerpicking techniques. When it comes to fingerpicking, there are a lot of different patterns, styles, and techniques to consider, and it can be overwhelming for beginners to know where to start. However, once you learn the basics and start to get comfortable with some of the more advanced fingerpicking methods, you’ll be able to add a whole new level of complexity and nuance to your playing that will allow you to truly shine as a country guitarist. In this article, we’ll provide step-by-step guidance on how to develop your fingerpicking skills, from the basics of reading fingerpicking tabs to creating your own unique fingerpicking style. We’ll also provide tips and advice on gear and setup, practice and performance, and highlight some iconic country songs that use fingerpicking techniques. Whether you’re a beginner just starting out or an experienced player looking to take your skills to the next level, this article will provide you with the guidance and inspiration you need to become a master of fingerpicking.
The Importance of Fingerpicking in Country Music
Fingerpicking is an essential technique for any player of country electric guitar. It’s a versatile playing style that allows musicians to create a range of sounds and emotions, from gentle and contemplative to fast-paced and energetic. Fingerpicking provides a unique sound that cannot be achieved through other techniques like strumming.
Country music is steeped in the tradition of fingerstyle guitar playing. Early country guitarists, such as Chet Atkins and Merle Travis, made fingerpicking a cornerstone of the genre, developing intricate patterns and techniques that have been emulated by countless musicians since. The fingerpicking style is also a staple in bluegrass music, which shares roots with country.
Fingerpicking is essential for capturing the inner heart of country music. The style is perfect for the storytelling aspect of country songs, especially ballads. It allows the guitar player to blend melody and rhythm, creating a full and vibrant sound that compliments any singer or band. Fingerpicking is a technique that can convey the emotion of the lyrics, as well as the musician’s own interpretation of the song.
While fingerpicking is not the only technique used in country guitar playing, it is a fundamental skill that all country guitarists should work to develop. In addition to the traditional fingerpicking patterns, underlining individuality is important to make a unique sound. Different effects pedals and amplifier settings can help diversify sound.
Below, is a table displaying some of the most important reasons to use fingerpicking in country guitar playing.
| Reasons to Use Fingerpicking in Country Guitar |
|---|
| Ability to play rhythm and melody at same time |
| Creates a unique sound |
| Suited for storytelling and ballads |
| Essential part of country and bluegrass tradition |
| Allows the freedom to create your own playing style |
Fingerpicking is an art form that is rich with history and provides a wealth of benefits to any country guitar player. Learning the basics of fingerpicking can open up a whole new world of sound and style for musicians to explore, and with time and practice, it can lead to mastery of the electric guitar. Choosing the right gear, such as pickups and strings, as well as developing a practicing routine are important factors that should not be overlooked. Choosing the right pickups, strings, and even amplifiers can make all the difference in achieving the desired sound for your fingerpicking playing style.
Fingerpick vs Strum
For beginners and seasoned players alike, the decision between fingerpicking or strumming can be a challenging one, with many factors to consider. When it comes to country electric guitar, both techniques play an integral role in achieving the desired sound and feel of a song. But what are the differences between the two and when should each be used? Let’s explore the intricacies of fingerpicking and strumming in creating the perfect country vibe.
Differences Between Fingerpicking and Strumming
When it comes to playing the country electric guitar, there are two primary techniques for producing sound: strumming and fingerpicking. While both are essential to the genre, they each produce a distinct sound and serve different purposes.
To understand the key differences between fingerpicking and strumming, let’s take a closer look:
| Technique | Description |
|---|---|
| Strumming | Using a pick or fingers to play multiple strings at once, often in a rhythmic pattern |
| Fingerpicking | Using the fingers to play individual strings, often in complex patterns |
As you can see, the primary difference between the two techniques is how the strings are played. With strumming, the focus is on producing a rhythmic pattern by playing multiple strings at once. In contrast, fingerpicking involves playing individual strings, allowing for more intricate and complex patterns.
While both techniques have their place in country music, fingerpicking is often favored for slower ballads and more intricate songs. Strumming, on the other hand, is ideal for faster-paced songs and creating a driving rhythm.
Ultimately, the choice between fingerpicking and strumming comes down to the song’s style and personal preference. Many guitarists even use both techniques in the same song to create variation and keep the listener engaged.
Now that we understand the differences between fingerpicking and strumming, let’s explore when to use each technique.
When to Use Fingerpicking vs Strumming
As a country electric guitar player, it’s important to know when to use fingerpicking versus strumming. While both techniques have their own advantages, they each create a distinct sound that can add variety to your playing.
When to use fingerpicking:
- When you want to create a softer, more delicate sound
- When you want to emphasize melody and individual notes rather than chords
- When you want to create a more complex and intricate pattern
- When you want to play arpeggios or fingerstyle arrangements
- When you want to play a song where fingerpicking is part of the arrangement or original recording
When to use strumming:
- When you want a driving, percussive rhythm
- When you want to create a full, rich sound with chords
- When you want to play along with a band or other musicians
- When you want to create a more straightforward and predictable pattern
- When you want to play a song where strumming is part of the arrangement or original recording
Knowing when to use fingerpicking versus strumming ultimately comes down to the effect you want to create in your playing. Experiment with both techniques and see which works best for the song you’re playing. And don’t be afraid to combine both techniques for a unique and dynamic sound.
Basic Fingerpicking Patterns

When it comes to playing country electric guitar, mastering fingerpicking patterns is crucial. Fingerpicking allows you to play complex melodies and chords with ease, while also providing a unique sound that strumming cannot achieve. In this section, we will explore the fundamentals of fingerpicking and introduce you to basic fingerpicking patterns that will lay the foundation for your development as a country electric guitarist. So, grab your guitar and let’s dive into the world of fingerpicking!
How to Read Fingerpicking Tabs
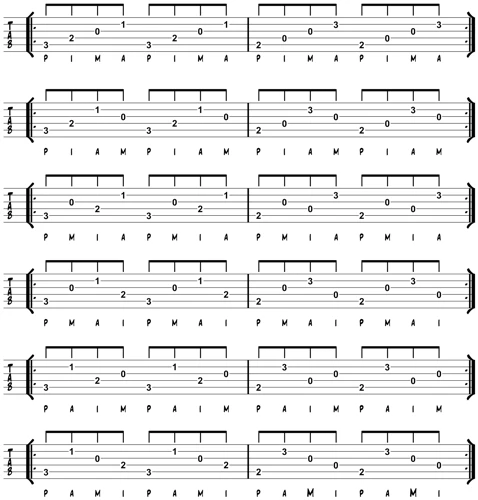
When learning how to fingerpick on the guitar, it’s essential to understand how to read fingerpicking tabs. Fingerpicking tabs are a form of guitar tablature that shows which strings and frets to play with your left hand and which fingers to use on your right hand. Here’s a breakdown of how to read fingerpicking tabs:
Reading Fingerpicking Tabs:
| Symbol: | Meaning: |
|---|---|
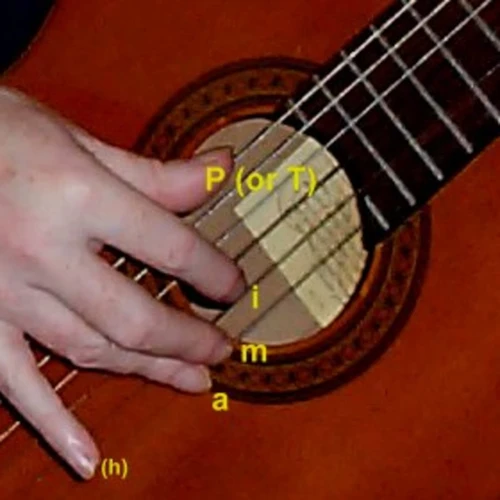
| p: | Thumb |
| i: | Index Finger |
| m: | Middle Finger |
| a: | Ring Finger |
| e: | High E String (1st String) |
| B: | B String (2nd String) |
| G: | G String (3rd String) |
| D: | D String (4th String) |
| A: | A String (5th String) |
| E: | Low E String (6th String) |
As you can see in the table above, fingerpicking tabs use different symbols to represent each finger and each string. When a number appears on a particular string and fret, that means you should fret that note with your left hand. For example, if you see a “2” on the A string, that means you should place your finger on the second fret of the A string. The letters p, i, m, and a indicate which finger you should use when plucking that particular string.
It’s important to note that fingerpicking tabs don’t always indicate which finger to use on every note. Sometimes it’s left up to the player’s discretion, depending on the context of the music. Be sure to listen closely to the song and carefully study the tabs to get a good grasp of which finger to use in each situation.
Once you have a good understanding of how to read fingerpicking tabs, you can start practicing with some basic fingerpicking exercises. Remember to take it slow and be patient with yourself as you learn this technique. With enough practice and dedication, you’ll soon be able to fingerpick your favorite songs with ease.
Fingerpicking Exercises for Beginners
If you’re new to fingerpicking, it’s important to start with some basic exercises to build your dexterity and strengthen your fingers. These exercises will help you get comfortable with fingerpicking and develop the muscle memory you need to play more complex patterns.
Exercise 1: Start with simple thumb and finger motions. Rest your index finger on the G string and your thumb on the low E string. Pluck the strings in this order: thumb, index, thumb, middle, thumb, ring. Once you’re comfortable with this pattern, switch to the next set of strings and repeat the pattern.
Exercise 2: This exercise involves playing a basic melody using your thumb and fingers. Start on the G string with your thumb, then pluck the B string with your index finger, followed by the high E string with your middle finger. Repeat this pattern on different strings and move to different frets to practice.
Exercise 3: For this exercise, you will need to use your thumb, index, and middle finger. Start by resting your thumb on the low E string, your index finger on the G string, and your middle finger on the high E string. Pluck the strings in this order: thumb, index, middle, index. Repeat the pattern on different strings and move to different frets to practice.
Exercise 4: This exercise involves playing a bass line and melody simultaneously. Rest your thumb on the A string and your index, middle, and ring fingers on the G, B, and high E strings respectively. Pluck the A string with your thumb, followed by the G, B, and high E strings in succession with your fingers. Repeat the pattern on different strings and move to different frets to practice.
Exercise 5: This exercise involves playing a simple chord progression using fingerpicking. Start with a G chord and pluck the strings using your thumb, index, and middle fingers. Switch to a D chord and repeat the pattern. Then switch to a C chord and repeat the pattern again. Practice this progression until you can switch between chords smoothly.
These exercises are a great starting point for anyone who wants to learn fingerpicking on the electric guitar. Practice them regularly to build your finger strength, dexterity, and muscle memory. As you become more comfortable with these exercises, you can start incorporating more complex fingerpicking patterns and techniques into your playing.
Intermediate Fingerpicking Patterns
Once you’ve mastered the basics of fingerpicking, it’s time to take your skills to the next level. As you dive into intermediate fingerpicking patterns, you’ll encounter new techniques and challenges that will push you to grow as a guitarist. These patterns require a greater degree of finger independence and coordination, but they also offer greater versatility and complexity in your playing. Throughout this section, we’ll explore advanced fingerpicking techniques, playing fingerstyle country blues guitar, and how to add variation and improvisation to your fingerpicking. So grab your guitar and let’s dive in.
Advanced Fingerpicking Techniques
Now that you have a good understanding of the basic fingerpicking patterns, it’s time to move on to the more challenging advanced fingerpicking techniques. These techniques will take your fingerpicking game to a whole new level, allowing you to create intricate and complex rhythms that will impress your audience.
Here’s an html table with some of the most common advanced fingerpicking techniques:
| Technique | Description |
|---|---|
| Travis Picking | A fingerpicking style named after guitarist Merle Travis. It involves alternating bass notes with melody notes played on the upper strings. |
| Fingerstyle Slap | A technique popularized by players such as Mark Knopfler and Chet Atkins. It involves slapping the lower strings with the thumb, while simultaneously picking melody notes with the fingers. |
| Harmonics | A technique where you lightly touch the strings with your left hand to create a ringing, bell-like sound. |
| Double Stops | A technique where you play two notes simultaneously on adjacent strings. This creates a fuller, richer sound and is often used in country music. |
| Alternate Tunings | Changing the tuning of your guitar to create interesting and unique sounds. Common alternate tunings for fingerpicking include open G and DADGAD. |
Try incorporating these advanced techniques into your playing by practicing them individually and then gradually combining them with basic fingerpicking patterns. Don’t be afraid to experiment and find your own unique style. The more you practice, the more comfortable you’ll become with these techniques, and the better you’ll be able to use them in your playing.
Playing Fingerstyle Country Blues Guitar
Playing fingerstyle country blues guitar is an advanced technique that requires skill and practice. To play fingerstyle country blues guitar, you need to use your fingers to play individual notes and chords, instead of using a pick. This technique can be challenging, but it adds a lot of depth and richness to your playing.
Technique
To play fingerstyle country blues guitar, you need to use a variety of techniques, including fingerpicking, hammer-ons, pull-offs, and slides. Fingerpicking involves playing with your fingers instead of a pick. Hammer-ons and pull-offs involve using your fingers to hold down or release strings to create different notes. Slides involve moving your fingers up or down the fretboard while still holding down the strings.
Blues Progressions
To play fingerstyle country blues guitar, you need to know some common blues progressions. One of the most common is the 12-bar blues progression, which involves playing chords in a specific order for 12 bars. The chords used in this progression are typically the I, IV, and V chords of the key you’re playing in.
Fingerstyle Techniques
There are several fingerstyle techniques you can use when playing country blues guitar. One of the most common is the Travis picking technique, which involves alternating your thumb and fingers to play a steady bassline while your fingers play the melody. This technique is often used in country blues and has a distinctive sound.
Another technique you can use is called pinch picking. This involves using your thumb and another finger to pluck two or more strings simultaneously. This creates a fuller, more complex sound than just playing one string at a time.
Fingerstyle Country Blues Songs
There are many fingerstyle country blues songs you can learn to play, including classics like “Walking Blues” by Robert Johnson and “Cross Road Blues” by Cream. You can also learn more modern songs, like “Rollin’ and Tumblin'” by Bob Dylan or “When My Train Pulls In” by Gary Clark Jr.
Playing fingerstyle country blues guitar requires a lot of practice and patience, but it can be incredibly rewarding. By learning proper technique and practicing regularly, you can add a unique and beautiful sound to your country guitar playing.
Creating Your Fingerpicking Style
One of the greatest joys of learning fingerpicking techniques for country electric guitar is putting your own spin on the music. With endless possibilities for variation and improvisation, creating your fingerpicking style can feel overwhelming. But fear not! By experimenting with different techniques and combining patterns, you can develop a unique sound that is entirely your own. In this section, we’ll explore ways to add variation and improvisation to your playing and how to combine different fingerpicking patterns to create your own style. Let’s dive in!
Adding Variation and Improvisation to Your Fingerpicking
Once you have mastered some basic and intermediate fingerpicking patterns, you can start exploring ways to add variation and improvisation to your playing. Here are some tips to help you get started:
- Experiment with different fingerpicking patterns: Mix and match different fingerpicking patterns and techniques to create your own unique sound. Try playing a pattern in a different time signature, or use a different fingerpicking pattern for each verse of a song.
- Alter the rhythm: Add some syncopation or change the timing of certain notes to create a new rhythm. You can also try playing a pattern at a slower or faster tempo than it is normally played.
- Use fingerpicking embellishments: Incorporate hammer-ons, pull-offs, and slides into your fingerpicking patterns to add some flair and style to your playing.
- Play around with chord progressions: Experiment with different chord progressions within a song or even try changing the key of a song to create a new sound and feel.
- Improvise solos: Once you are comfortable with basic fingerpicking patterns and have developed some skills with variations and embellishments, try improvising a solo over a chord progression. Use scales, arpeggios, and intervals to create your own melodies.
- Listen to other fingerstyle players: Listen to other fingerstyle guitar players and study their techniques. Try to incorporate some of their styles and techniques into your own playing.
Remember, developing your fingerpicking skills takes time and practice. Don’t be afraid to experiment and make mistakes. With patience and perseverance, you will develop your own unique fingerpicking style and become a skilled fingerstyle player.
Combining Fingerpicking Patterns and Techniques
Once you have mastered some basic and intermediate fingerpicking patterns and techniques, it’s time to start combining them to create your unique style. The key to successful fingerpicking is developing your muscle memory so that you can switch between patterns effortlessly. Here are some tips for combining fingerpicking patterns and techniques:
- Overlap patterns: One way to create interesting fingerpicking is to overlap patterns. For example, you can play a bass line with your thumb while playing a melody with your other fingers. This can create a complex and layered sound.
- Alternate patterns: You can also alternate between different fingerpicking patterns. For example, you can play a basic Travis picking pattern and then switch to a more complex roll pattern after a few measures. This creates a dynamic and varied sound.
- Use harmonics: Incorporating harmonics into your fingerpicking can add a unique and ethereal quality to your playing. Try adding harmonics to your melodies or using them as a transition between patterns.
- Experiment with timing: Experimenting with timing can create a sense of tension and release in your playing. Try playing a pattern slightly off-beat or holding a note longer than usual to create a unique and memorable sound.
- Combine genres: Don’t be afraid to combine fingerpicking patterns and techniques from different genres. For example, you could incorporate a bluesy slide into a country fingerpicking pattern or use a flamenco technique in a folk tune.
The key to successfully combining fingerpicking patterns and techniques is to experiment and play around with different combinations until you find something that sounds unique and interesting to you. Remember to practice each pattern individually before trying to combine them, and don’t be afraid to make mistakes. With time and practice, you’ll develop your fingerpicking skills and create your own distinct style.
Popular Country Fingerpicking Songs
As you progress with your fingerpicking technique on the country electric guitar, it’s essential to have the right practice materials. One way to solidify your skills is by learning and practicing popular country fingerpicking songs. These songs not only provide a fun and interactive way to practice, but they also help you understand how to apply fingerpicking patterns and techniques in a musical context. In this section, we’ll explore a few of the must-know songs for any country guitar enthusiast. So grab your guitar, tune it up, and let’s dive in!
‘Dust In The Wind’ by Kansas
One of the most popular country fingerpicking songs is “Dust In The Wind” by Kansas. This slow and melancholic tune features a beautiful fingerpicking pattern, perfect for practicing and showcasing your fingerpicking skills. Here is a breakdown of the song:
| Section | Chords | Fingerpicking Pattern |
|---|---|---|
| Intro/Verse | Am – G – C – F | Thumb on bass note (6th or 5th string) followed by index, middle, and ring fingers playing the treble strings in the pattern of: 4-3-2-1-2-3 |
| Chorus | G – Am – Em – D | Alternating bass pattern on 6th and 5th strings with thumb, followed by index, middle, and ring fingers playing the treble strings in a pattern of: 2-1-2-3 |
To play this song effectively, it’s important to focus on keeping a steady rhythm and allowing the notes to ring out fully. Use your thumb to pluck the bass notes and the rest of your fingers to pick the treble strings for a full and rich sound. As you become more comfortable with the basic fingerpicking pattern, you can experiment with variations and embellishments to make the song your own.
Don’t be afraid to slow down the tempo or simplify the fingerpicking pattern as needed, especially if you are a beginner. Like any other skill, fingerpicking takes practice and patience, so keep at it and eventually you will be able to play “Dust In The Wind” and other country fingerpicking songs with ease and confidence.
‘Blackbird’ by The Beatles
One of the most famous fingerpicking songs of all time is “Blackbird” by The Beatles. This song is a great example of how fingerpicking can create a beautiful, intricate melody all on its own.
Structure:
- The song is played in 4/4 time and starts with a simple picking pattern using the thumb and first two fingers of the right hand.
- The intro consists of a descending bass line that repeats throughout the song.
- The verse follows a basic fingerpicking pattern using mostly open chords.
- The chorus features a different fingerpicking pattern and includes some chord changes.
- The bridge contains a more intricate fingerpicking pattern.
Techniques:
- The intro uses thumb picking to create a bass line while the first two fingers pluck higher notes.
- The verse uses alternating bass picking with the thumb while the first two fingers create melody and chords.
- The chorus includes some fingerpicking where the thumb plucks the bass notes while the first two fingers create melody and chords.
- The bridge uses more complex fingerpicking patterns that include triplets and upstrokes.
Tips:
- To master this song, it’s important to practice each section separately until you are comfortable with the patterns and positions.
- Try to develop a steady rhythm and timing by using a metronome or playing along with the recording.
- Remember to relax your hand and wrist while playing to avoid tension and fatigue.
- Take your time and don’t get discouraged if it takes some time to get it right.
Overall, “Blackbird” is a great song to learn for fingerpicking beginners as it consists of simple patterns that are easy to pick up. With practice, you can learn to play this classic song and add to your fingerpicking repertoire.
‘Your Man’ by Josh Turner
One of the most popular country songs to showcase fingerpicking techniques is “Your Man” by Josh Turner. The song has a slow tempo and features a beautiful fingerpicking pattern that uses the thumb and fingers in a unique way.
To play the fingerpicking pattern in “Your Man,” start with your index finger on the third string (G), your middle finger on the second string (B), and your ring finger on the first string (E). The thumb will alternate between the sixth string (E) and the fourth string (D). The pattern looks like this:
| Beat | Thumb | Index | Middle | Ring |
|---|---|---|---|---|
| 1 | E | – | – | E |
| 2 | – | – | B | – |
| 3 | D | – | – | – |
| 4 | – | – | B | – |
Keep in mind that this is just one possible fingerpicking pattern for “Your Man.” You can experiment with different finger combinations and rhythms to create your own unique version of the song.
In addition to the fingerpicking pattern, “Your Man” also incorporates some basic chords that are commonly used in country music, including G, C, D, and Em. To play along with the song, use a capo on the third fret and play the chords in the key of E.
Remember to take your time when learning and practicing fingerpicking patterns. It may take some time to build muscle memory and develop the coordination needed to play smoothly and accurately. But with patience and practice, you’ll be able to master the fingerpicking techniques and play country songs like “Your Man” with ease.
Gear and Setup

When it comes to fingerpicking on an electric guitar, having the right gear and setup can make a world of difference. From choosing the perfect guitar to finding the ideal strings and effects, every little detail can impact the tone and feel of your playing. In this section, we’ll explore some key considerations for gear and setup that will help you achieve the best possible fingerpicking sound for country music. So grab your guitar and let’s dive in!
Choosing the Right Guitar for Fingerpicking
When it comes to fingerpicking, choosing the right guitar is crucial. Here are some factors to consider:
- Body style: The shape and size of the guitar’s body affects the tone and projection. Classical and flamenco guitars have a wide, flat body which produces a warm, mellow sound. On the other hand, dreadnought, jumbo, and grand auditorium guitars have a larger body which projects a brighter sound, making them suitable for country fingerpicking.
- Neck width: The width of the guitar’s neck determines the spacing between the strings, and affects the ease of fingerpicking. A wider neck allows more space for your fingers to move between the strings, making it easier to fingerpick. However, a narrow neck is better suited for players with small hands.
- String height: Also known as action, the height of the strings above the fretboard affects the ease of playing. A lower action makes it easier to fret the strings, resulting in less fatigue on the hands during extended fingerpicking sessions.
- Scale length: The scale length refers to the distance between the nut and the saddle. Longer scale lengths result in higher string tension, which improves sustain and intonation. However, shorter scale lengths make bending notes easier, and are therefore preferred by some fingerpickers.
- Tonewood: The tonewood used in the guitar affects the overall tone and resonance. Mahogany and rosewood are popular tonewoods for fingerpicking, as they produce a warm, rich sound. Cedar and spruce are also commonly used for their bright and articulate tone.
Considering these factors when choosing your guitar for fingerpicking will help you find the right instrument that suits your style and preferences. Remember to try out different guitars before making a purchase to determine what feels comfortable and natural for your playing style.
Choosing the Right Strings for Fingerpicking
When it comes to fingerpicking on a country electric guitar, choosing the right strings is essential for achieving the perfect tone and sound. Here are some factors to consider when making your selection:
- Gauge: String gauge refers to the thickness of the strings. For fingerpicking, a lighter gauge string is recommended as it allows for more flexibility and easier finger movement. String gauges between .010 – .046 are often preferred for fingerpicking.
- Material: Strings can be made from a range of materials including nickel, steel, and bronze. Nickel strings produce a warmer sound, while steel strings are brighter and more expressive. Bronze strings sit in-between and are a popular choice for country-style fingerpicking.
- Coating: Coated strings are treated with a thin layer of polymer to protect them from wear and tear. These strings are ideal for extended use and provide a smoother and more comfortable feel while playing. However, coated strings can also impact the natural sound of the guitar, so try them out before making a final decision.
- Brand: The brand of strings can also make a difference in sound and overall quality. Experiment with different brands to see what works best for your playing style and preferences.
Ultimately, the right strings for fingerpicking on a country electric guitar will depend on your personal taste and playing style. It’s important to experiment with different options and find the ones that work best for you.
Effects and Amplifiers for Fingerpicking
As a fingerstyle country electric guitar player, selecting the right effects and amplifier can make a significant difference in the quality of your sound. Below, we will explore some popular options for achieving the perfect tone.
Effects
Fingerpicking requires individual notes to be clearly defined and discernible. The use of distortion pedals may not be ideal as they can cause notes to blend together, resulting in muddied sound. Instead, focus on using effects like reverb, compression, and delay to enhance your fingerpicking techniques.
The use of reverb pedals can add a sense of depth and space to your sound. When used with a slightly longer decay time, reverb can also help blend any gaps between notes, making the overall sound smoother.
Compression pedals can help control the difference between the soft and loud parts of your playing. This is particularly important when fingerpicking, as there can be significant variations in dynamic range. Compression ensures that all notes are balanced and clearly audible.
Delay pedals can be used to create an interesting echo effect, extending the length of each note and adding richness to your sound.
Amplifiers
When it comes to amplifiers, solid-state and digital amps are generally preferred for fingerpicking. This is because they produce a cleaner sound and are more transparent than tube amps. The latter tend to produce a warmer tone that can lend itself more to strumming.
Another factor to consider is the wattage of your amplifier. For most fingerstyle players, a lower wattage amp in the range of 5 to 20 watts is sufficient. This is because, when played fingerstyle, the dynamic range of the music is lessened, and thus less power is required.
It is also important to consider speaker size. Smaller speakers tend to create a more defined sound, which is ideal for fingerstyle playing. A speaker size between 8 and 12 inches is generally recommended.
Below is a summary of popular effects and amplifiers for fingerpicking:
| Effects | Amplifiers |
|---|---|
| Reverb | Solid-state amps |
| Compression | Digital amps |
| Delay | Low wattage amps |
| Speaker size 8-12 inches |
Remember, your choice of effects and amplifiers ultimately comes down to personal preference. Experimenting with different combinations, settings and devices can help you develop a unique and distinctive fingerpicking sound.
Practice and Performance Tips
As you progress in your fingerpicking journey, it’s important to not only learn new patterns and techniques, but also to focus on your performance skills. Playing with precision and confidence can make all the difference between a mediocre and exceptional performance. In this section, we will explore some practical tips and tricks to help you fine-tune your fingerpicking abilities and elevate your overall playing to the next level. From warming up exercises to advice on singing while playing, these tips will help you become a more well-rounded and versatile fingerstyle guitarist.
Warming Up and Stretching Your Fingers
As a fingerpicking guitar player, it is vital to take care of your hands so that you can play at your best. One way to do this is to warm up and stretch your fingers before playing. A good warm-up routine helps to keep your hands flexible and avoids any potential injuries.
Here is a warm-up and stretching routine you can follow before playing:
| Stretching exercise | Description |
|---|---|
| Wrist stretch | Hold out one arm with your palm facing down. Use the other hand to gently pull your fingers back towards your wrist. Hold for 10-15 seconds and then repeat with the other hand. |
| Finger stretch | Hold out one hand with your palm facing up. Use the other hand to gently pull each finger back towards your wrist, one at a time. Hold for 10-15 seconds and then repeat with the other hand. |
| Thumb stretch | Hold out one hand with your palm facing up. Bring your thumb across your hand towards your little finger and hold for 10-15 seconds. Repeat with the other hand. |
| Finger taps | With your hands relaxed at your sides, rapidly tap your fingers against your thighs for 30 seconds. This helps to warm up your finger muscles and joints. |
| Hand shakes | Shake out your hands for 10-15 seconds to loosen any tension in your arms and fingers. |
Remember to start with gentle stretches and gradually increase the tension as your fingers become more warmed up. Don’t force your fingers into any uncomfortable positions, as this can cause injury.
In addition to stretching before playing, it’s also important to take breaks and stretch during long playing sessions. Make sure to listen to your body and stop playing if you feel any pain or discomfort. By taking care of your hands and following a warm-up routine, you can keep your fingers healthy and continue to improve your fingerpicking skills.
Tips for Keeping a Steady and Consistent Rhythm
Maintaining a steady and consistent rhythm is crucial for any musician, but it can be especially challenging for fingerstyle guitarists. Here are some tips and techniques to help you keep your rhythm on track:
| Practice with a Metronome | Using a metronome can help you develop a strong sense of timing and rhythm. Start slow and gradually increase the tempo as you become more comfortable. |
| Tap Your Foot | Keeping your foot tapping along with the beat can help you stay in time. Try tapping your foot on the downbeat (the first beat of each measure). |
| Play with a Drum Track | Playing along with a drum track can be a fun and effective way to improve your timing. There are many free drum tracks available online that you can use for practice. |
| Start Slow and Gradually Increase Speed | Don’t try to play too fast too soon. Start slow and focus on playing accurately and consistently. As you become more comfortable, gradually increase the tempo. |
| Use a Click Track | A click track is another tool that can help you stay in time. It’s similar to a metronome, but it usually has a more consistent, electronic sound. |
| Practice with a Band | Playing with other musicians can help you improve your timing and rhythm. Try to find other guitarists or musicians in your area who are interested in playing country music. |
Remember, keeping a steady and consistent rhythm takes practice and patience, but with these tips and techniques, you can improve your timing and become a better fingerstyle guitarist.
How to Fingerpick and Sing at the Same Time
Mastering the art of fingerpicking and singing at the same time can be a challenging task, but with consistent practice and the right approach, it can also be highly rewarding. Here are some steps you can take to develop this skill:
| Step | Description |
|---|---|
| 1 | Start with a simple song: Choose a song with a basic chord progression and a simple melody to begin with. This will make it easier to focus on your fingerpicking pattern while singing. |
| 2 | Practice each part separately: Spend time practicing your fingerpicking pattern and your singing separately before attempting to combine them. This will help you develop muscle memory and reduce the chances of mistakes when you put them together. |
| 3 | Use a metronome: Practice your fingerpicking pattern with a metronome to develop a steady rhythm. This will also help you keep your singing in time with your playing. |
| 4 | Start slowly: Begin practicing your song at a slower tempo before gradually increasing the speed. This will allow you to focus on your fingerpicking while gradually building your confidence in your ability to sing and play at the same time. |
| 5 | Coordinate your movements: As you begin to put the two parts together, focus on coordinating your fingerpicking pattern with your singing. Start by playing simpler fingerpicking patterns and gradually add more complexity as you become more comfortable. |
| 6 | Record yourself: Record yourself playing and singing your song so that you can listen back and identify areas that need improvement. This will also help you track your progress over time. |
| 7 | Practice consistently: Like any skill, fingerpicking and singing takes time and consistent practice to develop. Make it a habit to practice every day, even if it’s only for a few minutes each time. |
Remember, the key to successfully fingerpicking and singing at the same time is patience, persistence, and a willingness to push yourself outside of your comfort zone. With these steps and a bit of determination, you’ll be able to develop this skill and add a new dimension to your country guitar playing.
Conclusion
As we near the end of our journey through understanding fingerpicking techniques for country electric guitar, it’s important to reflect on the valuable information we’ve covered. From the differences between fingerpicking and strumming to advanced fingerpicking techniques, readers have undoubtedly gained a deeper understanding of fingerstyle guitar playing. The tips, tricks, and exercises provided in this article can help guitarists of all levels improve their fingerpicking skills and broaden their repertoire. In this final section, let’s summarize what we’ve learned and solidify our newfound knowledge.
Summary of Fingerpicking Techniques for Country Electric Guitar
After reading this article, hopefully, you have gained a better understanding of fingerpicking techniques for country electric guitar . Here’s a summary of what you have learned:
| Key Point | Description |
|---|---|
| Fingerpicking vs Strumming | Learned the differences between fingerpicking and strumming, as well as when to use each technique. |
| Basic Fingerpicking Patterns | Understood how to read fingerpicking tabs and learned some beginner-level fingerpicking exercises. |
| Intermediate Fingerpicking Patterns | Explored advanced fingerpicking techniques and how to play fingerstyle country blues guitar. |
| Creating Your Fingerpicking Style | Discovered how to add variation and improvisation to your fingerpicking, as well as combining different fingerpicking patterns and techniques. |
| Popular Country Fingerpicking Songs | Discovered and learned how to play popular fingerpicking songs like “Dust in the Wind” by Kansas, “Blackbird” by The Beatles, and “Your Man” by Josh Turner. |
| Gear and Setup | Understood how to choose the right guitar and strings for fingerpicking as well as how different effects and amplifiers can enhance your fingerpicking sound. |
| Practice and Performance Tips | Learned some tips and techniques to help you warm up and stretch your fingers, keep a steady rhythm, and fingerpick while also singing. |
By mastering these fingerpicking techniques, you can take your country electric guitar playing to the next level and impress your audience with your skills. Remember to practice consistently, stay patient, and have fun while learning!
Frequently Asked Questions
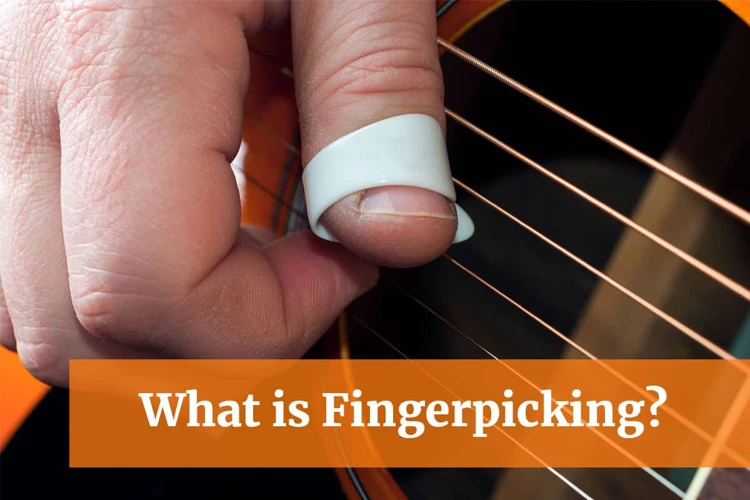
What is fingerpicking?
Fingerpicking is a technique in which the guitarist plucks the strings individually with their fingers, rather than strumming or using a pick.
What is the difference between fingerpicking and strumming?
The main difference between fingerpicking and strumming is the way the strings are played. Strumming involves using a pick or the fingers to play all the strings at once, while fingerpicking involves plucking the strings individually.
What are some basic fingerpicking patterns?
Some basic fingerpicking patterns include the alternating bass pattern, the Carter-style pattern, and the Travis picking pattern.
How do I read fingerpicking tabs?
Fingerpicking tabs are similar to regular guitar tabs, but they include notation for which fingers to use on which strings. Each number corresponds to a specific finger, with “1” being the thumb, “2” being the index finger, etc.
What are some intermediate fingerpicking patterns?
Intermediate fingerpicking patterns include the clawhammer pattern, the three-finger roll pattern, and the syncopated pattern.
What effects and amplifiers should I use for fingerpicking?
Fingerpicking sounds best with clean, natural tones, so it’s best to avoid heavy distortion or effects. A simple, high-quality amplifier and a reverb pedal can help enhance the warmth and depth of your fingerpicking sound.
What are some popular country fingerpicking songs?
Some popular country fingerpicking songs include “Dust in the Wind” by Kansas, “Blackbird” by The Beatles, and “Your Man” by Josh Turner.
How can I improve my fingerpicking speed and accuracy?
Practice is key for improving fingerpicking speed and accuracy. Start slow and gradually increase your speed, focusing on maintaining a consistent rhythm and clean, precise finger movements.
What type of guitar is best for fingerpicking?
Acoustic guitars with a rich, warm tone are often preferred for fingerpicking, though electric guitars can also work well. Look for guitars with a slightly wider neck and a comfortable, ergonomic shape.
How can I incorporate improvisation into my fingerpicking style?
Experiment with adding in new chords or changing up the rhythm of a familiar fingerpicking pattern. Try playing around with different finger movements to create new sounds and variations.