Picture this: you’re sitting around a campfire with friends, and someone pulls out a guitar. As soon as they begin to play the intricate fingerpicking patterns of country music, everyone stops to listen in awe. But how do they do it? The secret lies in mastering Travis picking, a complex style that originated in the 1950s and has since become a staple in country music. In this article, we’ll break down the origins of Travis picking, explore how to play it on your guitar, and give you a step-by-step guide to mastering this impressive technique. So grab your guitar, and let’s get started!
What is Travis Picking?

As a beginner or even an experienced guitar player, you might be wondering what Travis Picking is and how it’s relevant in country music. Simply put, Travis Picking is a fingerstyle guitar technique named after Merle Travis, a legendary American country guitarist. It involves alternating bass notes with melody notes using the thumb and other fingers. The result is an intricate and rhythmic sound that gives a full-bodied effect to the performance. Travis Picking is an essential skill for any country musician to learn, and it’s a useful addition to any repertoire. But before we dive deeper into mastering this technique, let’s first explore where it originated. If you want to learn more about strumming and rhythm in country music, check out this article.
Origins of the Style
Travis Picking is a fingerstyle guitar technique named after country guitarist Merle Travis (1917-1983). It is primarily associated with country music and emphasizes the thumb on the bass notes and the fingers on the treble strings in a specific pattern. Though Merle Travis is the name most commonly associated with the style, he was not the originator. He learned it from guitar player Mose Rager, who used the technique as early as the 1930s.
Travis Picking was born in the Appalachian Mountains of Kentucky in the 19th century. The technique evolved from a hybrid of styles, including classical Spanish guitar, African American banjo playing, and traditional Appalachian folk music. The technique was refined by early country music artists, such as guitarists like Maybelle Carter and Riley Puckett, in the 1920s and 1930s. However, it was Travis who eventually took the technique to new heights and popularized it in the mainstream music industry through his influential radio performances and recordings in the 1940s and 1950s.
Travis Picking is a key element in the country music strumming patterns, which is why it is crucial for any aspiring country guitarist to master this technique. In the following sections, we will guide you through the steps to playing Travis Picking, so you can add it to your guitar playing repertoire. If you’re new to playing country music, you may find it helpful to check out some basic strumming patterns for beginners here or some country-specific strumming patterns here. Additionally, understanding the time signatures commonly used in country music here and learning some country strumming patterns here can also be helpful.
Playing Travis Picking in Country Music
Travis picking is a must-have skill for anyone looking to delve into the world of country music. This fingerpicking technique, popularized by Merle Travis himself, creates a unique sound that’s simultaneously rhythmic and melodic. In order to achieve that recognizable twang, there are a few components you need to keep in mind when playing Travis picking. And it all starts with two crucial factors: choosing the right guitar and the right strings. Before we dive deep into mastering this style, let’s take a closer look at these factors and their importance in playing Travis picking. For those who want to create unique strumming patterns, we have an awesome guide on our website “Create Unique Strumming Patterns”.
Choosing the Right Guitar
When it comes to playing Travis picking in country music, choosing the right guitar is essential. Here are some important factors to consider when selecting a guitar:
- Acoustic vs. Electric: While both types of guitars can be used for Travis picking, many musicians prefer the warm, natural tone of an acoustic guitar. Electric guitars can work for Travis picking as well, but they tend to have a brighter, more compressed sound that may not be ideal for traditional country music.
- Body size: The size of the guitar’s body can affect both its sound and playability. A larger guitar will generally produce more volume and bass response, while a smaller guitar may be easier to handle and more comfortable to play for extended periods of time.
- Neck width: The width of the guitar’s neck can greatly impact its playability, especially for fingerstyle playing like Travis picking. A wider neck can give you more room to maneuver your fingers and provide better separation between the strings, while a narrower neck might be easier to grip for players with smaller hands.
- String height: Also known as “action,” string height is the distance between the strings and the fretboard. A higher action can make it more difficult to play fast, intricate patterns like Travis picking, so it’s generally best to choose a guitar with a lower action if you plan to use this technique.
- Tonewoods: The type of wood used in the guitar’s construction can have a significant impact on its tone. Popular tonewoods for acoustic guitars include spruce, cedar, mahogany, and rosewood. Each wood has its own unique characteristics, so it’s worth doing some research to find the sound that best fits your style.
- Budget: Finally, it’s important to consider your budget when selecting a guitar for Travis picking. While there are certainly high-end guitars that are ideal for this playing style, there are also many affordable options that can produce great results. Ultimately, the best guitar for you is the one that feels comfortable to play and produces the sound you’re looking for.
With these factors in mind, you can find a guitar that is well-suited to Travis picking and will help you achieve the sound you want.
Choosing the Right Strings
When it comes to learning how to play Travis picking, choosing the right strings for your guitar is an important step. The type of strings you use will determine the quality of sound your guitar produces, which can be critical for country music. Here are some tips to help you choose the right strings for your Travis picking style:
- String Gauge: The gauge of the string refers to its thickness. If you are just starting out with Travis picking, it is best to go for a lighter gauge string. Lighter gauge strings are easier to play and manipulate, which will help you develop the necessary technique for Travis picking.
- String Material: Strings can be made of various materials like nickel, bronze, or steel. Different materials will produce different sounds, so it is important to experiment with different materials to find the one that suits your playing style. Bronze strings, for example, are known for their bright and crisp sound, which is commonly used in country music.
- Coated vs. Non-Coated: Coated strings are covered with a protective layer that extends their lifespan and prevents corrosion. However, some players feel that coated strings produce a duller sound compared to non-coated strings. It is important to try out both types of strings to see which one sounds better to you.
By considering these aspects while choosing the right strings for Travis picking, you can get a quality sound that suits your needs. Remember, finding the right strings may take some time and experimentation, so don’t be afraid to try out different types and gauges until you find the one that feels best for you.
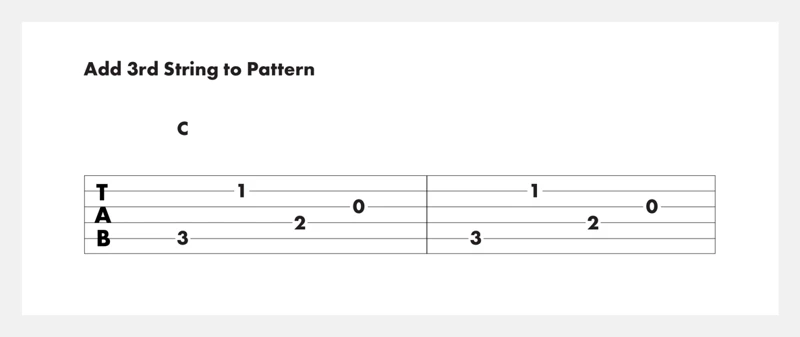
Basic Travis Picking Pattern
The Travis Picking pattern is a fingerpicking style that is commonly used in country music. The pattern was named after the legendary country guitarist Merle Travis, who was known for his use of the style.
The basic Travis Picking pattern consists of alternating bass notes played with the thumb while the other fingers pluck the higher strings. Here is an example of how the basic pattern looks like in tablature:
| String | Finger |
|---|---|
| 6th | thumb |
| 3rd | index finger |
| 2nd | middle finger |
| 1st | ring finger |
The pattern can be thought of as a bass note followed by a plucked chord, and it is usually played in a 4/4 time signature. The thumb will typically alternate between the lowest two bass strings (5th and 6th), while the other three fingers pluck the higher strings.
Practicing this basic pattern is a great starting point for mastering the Travis Picking style. Once you have the basic pattern down, you can start experimenting with different variations and incorporating it into your country guitar playing.
It is important to note that while the basic pattern is simple, it can take some time to get the coordination and muscle memory down. Taking it slow and gradually building up speed and accuracy is key to mastering Travis Picking.
Variations on the Pattern
Once you have mastered the basic Travis picking pattern, you can start exploring variations on the pattern to add more flavor and complexity to your playing. Here are some common variations on the pattern:
| Variant | Description |
|---|---|
| Bass-Note-Only Pattern | This is a simplified version of the Travis picking pattern where you only play the bass notes of the chords. This creates a driving, rhythmic effect that is commonly used in country music. |
| Arpeggio Pattern | In this variation, instead of playing the bass note and the higher strings simultaneously, you play them one at a time in an arpeggiated fashion. This creates a more delicate, flowing effect that is often used in ballads and slow songs. |
| Double-Thumb Pattern | In this variation, you add an extra thumb stroke between the bass note and the higher strings, creating a “thump-thump-pluck” rhythm. This creates a more complex and syncopated feel that can be used in more upbeat songs. |
| Harmonics Pattern | This variation involves using harmonics in place of the higher strings in the pattern. This creates a chime-like effect that can add a lot of interest and texture to your playing. |
Experiment with these variations and see which ones work best for the songs you are playing. Don’t be afraid to come up with your own variations as well. Remember, the key to mastering Travis picking is to make it your own and add your own personal style to it.
Step-by-Step Guide to Mastering Travis Picking
Are you ready to take your country guitar playing to the next level? Look no further – we’ve compiled a step-by-step guide to help you master the complex and intricate style of Travis Picking. This fingerstyle technique, developed by country music legend Merle Travis, creates a syncopated and engaging rhythm that provides the foundation for many popular country tunes. Although it may seem challenging at first, with the right approach and dedication, you can become a Travis Picking master. So grab your guitar and let’s get started!
Step One: Getting the Right Hand Technique
The foundation of Travis Picking is the right hand technique. Here is a step-by-step guide to get the right hand technique:
- Thumb Positioning: Start by placing your thumb on the 5th or 6th string. Keep your thumb relaxed and loose. Use your thumb to strike the bass note while your other fingers pick the melody.
- Index Finger: Use your index finger to pluck the 3rd string.
- Middle Finger: Use your middle finger to pluck the 2nd string.
- Ring Finger: Use your ring finger to pluck the 1st string.
Always try to strike the bass note with your thumb and follow through with your finger plucks. Remember to keep your right hand relaxed throughout the process. Repeat this process until you can pick the bass note and melody in synchronization.
Once you get comfortable with playing the basic Travis Picking pattern, you can start to experiment with variations. You can change the order in which you pluck the notes or even skip some notes altogether.
It’s important to practice the right hand technique slowly and consistently until you can play it perfectly. Do not rush the process. As you progress, try to increase the tempo of your playing to develop speed and accuracy.
Step Two: Coordinating with the Left Hand
To truly master Travis picking in country music, it’s not just about developing a solid right-hand technique, but you also need to coordinate with your left hand. Here are some steps to help you coordinate the two hands seamlessly:
- Positioning: First, ensure that you have proper positioning of your left hand on the guitar’s fretboard. The neck should rest comfortably in the web of your hand, and your fingertips should press down firmly and accurately on the strings.
- Chord Changes: Next, practice changing chords smoothly and without interrupting the rhythm. To do this, start by playing a simple chord progression, like G-C-D. Focus on making the chord changes as smooth and efficient as possible, and be sure to use the correct fingers for each chord.
- Use Muscle Memory: To effectively coordinate your left hand with your right, you’ll need to develop muscle memory. This means repeating the different chord changes and patterns over and over again (slowly at first), until your fingers automatically know where to go without even thinking about it.
- Practice Slowly: Slow and steady wins the race! Don’t rush it by trying to play too fast before you’re ready. Slowly build up speed only after you’ve developed accuracy and consistency in your chord changes.
Remember, don’t get discouraged if at first, the coordination between your left and right hand feels clunky and out of sync. With enough practice, you’ll eventually develop the muscle memory and coordination necessary to play Travis picking like a pro.
Step Three: Developing Speed and Accuracy
Developing speed and accuracy is an essential step in mastering Travis Picking. Here are some exercises that you can practice to improve your skills:
| Exercise | Description |
|---|---|
| Exercise One: | Pick a basic Travis Picking pattern and practice playing it with a metronome. Start at a slow tempo and gradually increase the speed as you become comfortable with the pattern. Focus on keeping a consistent rhythm and accuracy. |
| Exercise Two: | Choose a more complex Travis Picking pattern and practice playing it slowly. Focus on getting the pattern right before increasing speed. Use a metronome to make sure you are keeping a consistent rhythm. |
| Exercise Three: | Practice playing alternate bass notes with your thumb while playing the melody with your other fingers. Start at a slow tempo and gradually increase the speed. Use a metronome to keep a consistent rhythm and accuracy. |
| Exercise Four: | Practice incorporating hammer-ons and pull-offs into your Travis Picking pattern. Start slowly and focus on accuracy before increasing speed. Use a metronome to keep a consistent rhythm. |
| Exercise Five: | Choose a song that incorporates Travis Picking and practice playing it along with the recording. Start at a slower tempo and gradually increase the speed as you become comfortable with the pattern. Focus on accuracy and rhythm. |
Remember, developing speed and accuracy takes time and practice. Don’t get discouraged if you don’t see improvement right away. Keep practicing and before you know it, your Travis Picking skills will be top-notch!
Exercises to Improve Your Travis Picking
Are you ready to take your Travis picking to the next level? It’s time to get your fingers moving with some exercises designed to improve your technique and accuracy. These essential drills will help you overcome common mistakes and develop the skills you need to become a confident country guitar player. Whether you’re a beginner or an experienced picker, these challenging exercises will push you to improve your skills and take your playing to new heights. Are you ready to get started? Let’s dig in!
Exercise One: Four-Finger Exercise
One great exercise for improving your Travis picking technique is the four-finger exercise. This exercise focuses on coordination and finger independence. Here’s how you can do it:
- Begin by placing your index finger on the G string, your middle finger on the B string, your ring finger on the high E string, and your pinky finger on the first string.
- Using your thumb, pick the low E string, then follow with your index, middle, ring, and pinky fingers one by one on the strings where they are placed.
- Next, move your index finger to the D string and repeat the pattern, starting with your thumb on the A string.
- Continue this pattern for each string, moving your index finger from the G to the high E string, and then back to the low E string.
It’s important to keep your picking hand steady and your fingers close to the strings to minimize unnecessary movement. This exercise can be challenging at first, but with practice, you’ll notice a significant improvement in your finger agility and independence.
To make the exercise even more challenging, you can try adding “hammer-ons” or “pull-offs” to your finger movements. For example, when you play the note with your index finger, you can use your ring finger to “hammer-on” the next note on the same string. And when you play the note with your ring finger, you can use your index finger to “pull-off” to the previous note.
Remember to start slow and gradually increase your speed as you become more comfortable with the exercise. By practicing this four-finger exercise on a regular basis, you’ll be well on your way to mastering Travis picking in country music.
Exercise Two: Changing Chords with Travis Picking
One of the biggest challenges when it comes to playing Travis picking is changing chords seamlessly while maintaining the pattern. This exercise is designed to help you become more comfortable with switching between chords while keeping the pattern going.
The Exercise
Start by selecting two chords that you are comfortable with, such as G and C. Then, practice the following steps:
- Begin by playing the picking pattern on the G chord for one measure.
- Then, while still maintaining the picking pattern, switch to the C chord and play for one measure.
- Switch back to the G chord and play for one measure.
- Finally, switch back to the C chord and play for one measure.
Repeat these steps until you feel comfortable switching between the chords while maintaining the picking pattern. Once you feel more confident, you can try incorporating other chords and making the changes more quickly.
Why This Exercise Helps
This exercise is beneficial because it helps you develop muscle memory for switching between chords while picking. It also trains your ear to recognize when a chord change is coming up, which can be helpful in other areas of playing as well.
When first starting out with this exercise, it may be helpful to use a metronome or to count out loud to ensure that you are keeping a consistent rhythm.
Table of Steps:
| Step | Description |
|---|---|
| 1 | Play the picking pattern on the G chord for one measure. |
| 2 | Switch to the C chord while maintaining the picking pattern and play for one measure. |
| 3 | Switch back to the G chord and play for one measure while maintaining the pattern. |
| 4 | Switch back to the C chord and play for one measure while maintaining the pattern. |
Exercise Three: Practicing with a Metronome
One of the best ways to improve your Travis Picking is to practice with a metronome. A metronome is a device that produces a steady beat, which helps you keep time and play at a consistent tempo. This is important when playing Travis Picking because the rhythm is such a crucial element of the style.
To begin practicing with a metronome, start at a slow speed and gradually increase the tempo as you become more confident. This will help you develop speed and accuracy in your playing, as well as train you to keep a consistent rhythm.
Here is a table demonstrating how to use a metronome:
| Step | Instructions |
|---|---|
| Step One | Set the metronome to a slow tempo, such as 60 beats per minute (BPM). |
| Step Two | Begin playing a basic Travis Picking pattern, such as the one described earlier in the article. |
| Step Three | Try to play along with the metronome, matching the tempo with your picking hand. |
| Step Four | If you make a mistake or lose the rhythm, stop and start again from the beginning. |
| Step Five | Once you can play the pattern accurately at a slow tempo, gradually increase the speed of the metronome, challenging yourself to keep up with the faster tempo. |
| Step Six | Practice with the metronome for at least 10-15 minutes a day, gradually increasing the speed as you become more comfortable. |
Remember, practicing with a metronome is all about building your accuracy and speed, so don’t rush the process. Take your time, start slow, and gradually increase the tempo over time. With consistent practice, you’ll be able to master Travis Picking and play it with confidence and style.
Common Mistakes When Playing Travis Picking
As with any skill, there are common mistakes that players can make when learning Travis Picking. These mistakes can hinder progress and prevent players from achieving the desired sound and rhythm. It’s important to be aware of these mistakes and work to correct them. In this section, we’ll explore some of the most common mistakes that players make when learning Travis Picking and offer tips on how to overcome them. So, let’s dive in and fine-tune our Travis Picking technique!
Mistake One: Using the Wrong Fingers
One of the most common mistakes that beginner guitarists make when trying to master the Travis Picking pattern is using the wrong fingers. The correct finger placement is key to achieving a smooth and accurate sound. Below is a table showing the correct finger placement for each string:
| String | Thumb | Index | Middle |
|---|---|---|---|
| Bass String (6th) | Thumb | ||
| 5th String | Index | ||
| 4th String | Middle | ||
| 3rd String | Index | ||
| 2nd String | Ring | ||
| 1st String | Index |
As seen in the table above, each finger is assigned to a specific string. The thumb is used exclusively for the bass string (6th string), whereas the index, middle, and ring fingers are assigned to the 5th, 4th, and 2nd strings respectively. Using the wrong finger can result in muted notes or a sloppy sound.
It is important to note that this finger placement is not set in stone and certain variations or adaptations are acceptable as well. However, in general, it is best to stick to the traditional finger placement to achieve the desired sound. To avoid making this mistake, it is essential to practice finger placement exercises until it becomes second nature.
Mistake Two: Not Keeping the Rhythm Consistent
One of the most common mistakes that beginner Travis Pickers make is not keeping the rhythm consistent. In order to sound like a pro, it is important to maintain a steady and even rhythm. Here are some reasons why you might struggle with this mistake:
- Lack of practice: If you don’t practice regularly, your muscles won’t be trained to keep the rhythm. This means that you might speed up or slow down without even realizing it.
- Lack of focus: playing Travis picking requires a lot of concentration, and if you get distracted or lose focus, you might lose your place in the rhythm, causing it to become inconsistent.
- Poor technique: if your right hand or left hand technique is incorrect, it could cause you to stumble in the rhythm.
In order to fix this mistake, it’s important to practice with a metronome to keep the rhythm consistent. Start at a slower tempo and gradually increase the speed as you become more comfortable. It is also helpful to practice playing along with recordings of songs that use Travis picking to gain a better sense of how the rhythm should sound.
Another way to improve your rhythm is to focus on your right hand technique. Make sure that your fingers are plucking the strings evenly and that there is no accidental muting of the strings. Additionally, ensure that you are using the correct finger picking pattern and that you’re not skipping beats or changing the pattern without intention.
Maintaining a consistent rhythm is crucial when it comes to mastering Travis picking. It takes time and practice to develop the muscle memory and coordination needed to keep the rhythm steady, so be patient and consistent in your efforts. By practicing with a metronome, focusing on your technique, and listening to recordings, you’ll be well on your way to playing Travis picking like a pro.
Mistake Three: Neglecting the Damping Technique
When it comes to mastering Travis Picking pattern in country music, one of the common mistakes that aspiring guitar players make is neglecting the damping technique. Damping is crucial in Travis Picking since it allows you to cut off the sound of the strings you have just played, creating a more articulate and distinct sound.
So, what is damping?
Damping, also known as muting, is a technique that involves using either your right or left hand to mute the sound of the strings you have just played. This technique is necessary because without it, the notes will overlap, creating a muddy sound.
How to do damping?
There are two ways to dampen the strings while Travis picking:
- Palm Muting: This technique involves resting the heel of your right hand on the strings near the bridge after playing the note with your fingers. The pressure from your hand will muffle the sound, creating a sharper and more controlled sound.
- Fret Hand Muting: This technique involves using the fingers of your fretting hand to silence the strings by lightly touching them as soon as you have played them. This will prevent the string from vibrating, resulting in a cleaner sound.
Why is damping important?
Damping is important in Travis picking because it helps to create a more articulate and distinct sound. Without damping, the notes tend to blend together, creating a muddy and uncontrolled sound. Damping also allows you to produce a more rhythmic groove and create a more dynamic sound.
To avoid neglecting damping technique and enhance the sound quality, always try to incorporate damping into your regular practice routine. Once you’ve mastered it, you’ll find that your Travis Picking will sound more refined, and you’ll be well on your way to playing like a pro.
Conclusion
In conclusion, mastering Travis picking pattern in country music can be a challenging yet rewarding experience for any guitarist. With the techniques and exercises outlined in this article, you can improve your fingerpicking skills and play like a pro in no time.
Remember to choose the right guitar and strings for your playing style, and to start with the basic Travis picking pattern before moving on to more complicated variations.
Through step-by-step practice and consistent training, you can achieve accuracy, speed and dexterity in your right-hand technique, and learn to coordinate your picking hand with your fretting hand for smooth and fluid chord changes.
It is important to be mindful of common mistakes such as using the wrong fingers, neglecting damping technique and not keeping the rhythm consistent, so you can avoid them as you progress towards mastery.
Finally, don’t forget to have fun and enjoy the process of learning and improving your Travis picking skills. Whether you’re a beginner or an intermediate player, the tips and exercises outlined in this article can help you take your playing to the next level and become a confident and skilled guitarist. So keep practicing, keep learning, and keep picking!
Frequently Asked Questions
What famous country songs use Travis Picking pattern?
Some famous country songs that use Travis Picking include “Dust in the Wind” by Kansas, “Here Comes the Sun” by The Beatles, and “Landslide” by Fleetwood Mac.
What are the origins of Travis Picking?
Travis Picking was named after Merle Travis, a guitarist who developed the style in the 1940s. It has its roots in traditional country and folk music, and is characterized by the alternating bassline and syncopated melody.
Can Travis Picking be used in genres other than country music?
Absolutely! While Travis Picking is commonly associated with country music, it can be used in a variety of genres including folk, rock, and even fingerstyle arrangements of pop songs.
Do I need a special type of guitar to play Travis Picking?
Not necessarily. While some guitarists prefer a specific type of guitar, such as a Martin or Gibson acoustic, any guitar with a good tone and comfortable playability can be used to play Travis Picking.
What type of strings are best for Travis Picking?
Light-gauge strings are often recommended for Travis Picking, as they are easier to fret and allow for a quicker response time. Many guitarists also prefer coated or phosphor bronze strings for their warm tone.
How long does it take to master Travis Picking?
Mastering any technique takes time, and the amount of time it takes to master Travis Picking will vary depending on the individual. However, consistent practice and dedication can lead to significant improvement over time.
How can I improve my Travis Picking speed?
Gradually increasing your speed while maintaining accuracy and control is key. Practice with a metronome and gradually increase the tempo, or try practicing the pattern slowly with a focus on relaxation and efficiency of movement.
What is the damping technique in Travis Picking?
The damping technique involves using the palm of the picking hand to mute the strings after playing a note or chord. This creates a more percussive sound and helps keep the rhythm tight and controlled.
What is the four-finger exercise for Travis Picking?
The four-finger exercise involves using all four fingers of the fretting hand to play a pattern of notes on different strings, while maintaining a consistent alternating bassline with the picking hand. This helps improve both left and right hand coordination.
What is the benefit of practicing Travis Picking with a metronome?
Practicing with a metronome helps improve timing and rhythm, which is crucial for playing Travis Picking accurately and consistently. It also allows you to gradually increase your speed over time.