Country music is a genre that is deeply rooted in American culture, known for its distinct sound and storytelling lyrics. One of the key elements in country music is the guitar, which often plays a central role in creating the signature twang and melodies that define the genre. Whether you’re a beginner looking to improve your skills or a seasoned musician wanting to hone your craft, incorporating essential guitar exercises into your practice routine is crucial for mastering the country music style. In this article, we’ll explore a variety of exercises designed specifically for country musicians to help you develop your technique, improve your playing, and enhance your overall musicality.
Essential Guitar Exercises For Country Musicians
1. Fingerpicking Patterns
Fingerpicking is a fundamental technique in country music that adds depth and richness to your playing. Practice various fingerpicking patterns using your thumb, index, middle, and ring fingers to create intricate melodies and rhythms. Start with simple patterns and gradually increase the complexity as you become more comfortable. Experiment with alternating bass notes and syncopated rhythms to add dynamic flair to your playing.
2. Hybrid Picking
Hybrid picking combines the use of a flatpick and fingers to create a versatile and dynamic sound. Practice picking individual notes with your flatpick while using your fingers to pluck strings simultaneously. This technique allows you to achieve a fast and fluid playing style, ideal for country guitar solos and embellishments. Focus on precision and coordination between your pick and fingers to master this technique effectively.
3. Bending and Vibrato
Bending and vibrato are essential techniques that add expression and emotion to your guitar playing. Practice bending notes to reach higher pitches and create a signature country music sound. Experiment with different bending techniques, such as full and half-step bends, to add color and texture to your melodies. Additionally, work on developing a smooth and controlled vibrato to enhance the sustain and feel of your notes.
4. Chord Progressions
Mastering common chord progressions is essential for any country musician. Practice transitioning between chords smoothly and efficiently to create a seamless flow in your playing. Focus on popular country chord shapes, such as open chords and barre chords, and experiment with different voicings to add variety to your progressions. Incorporate strumming patterns and arpeggios to enhance the rhythmic aspect of your chord playing.
5. Slide Guitar Techniques
Slide guitar is a hallmark of country music, adding a distinctive sound and character to your playing. Practice slide techniques using a glass or metal slide to create smooth glissandos and expressive slides between notes. Experiment with different slide positions and tunings to discover unique sounds and textures. Focus on intonation and control to achieve a clean and precise slide guitar sound.
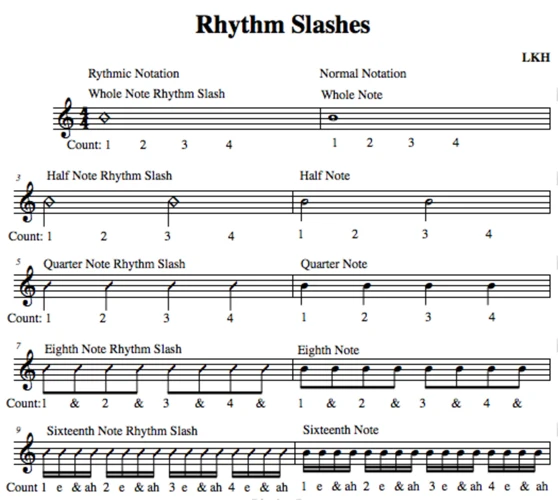
6. Rhythm Exercises
Developing a strong sense of rhythm is crucial for country musicians to stay in time and groove with the music. Practice strumming along to country songs of varying tempos and styles to improve your timing and feel. Experiment with different strumming patterns, accents, and syncopations to enhance your rhythmic versatility. Use a metronome or drum machine to practice playing in different time signatures and subdivisions.
7. Fingerstyle Techniques
Fingerstyle playing is a versatile technique that allows you to create intricate melodies and harmonies on the guitar. Practice fingerstyle patterns using your thumb, index, middle, and ring fingers to pluck strings independently. Focus on finger independence and dexterity to execute complex fingerpicking arrangements accurately. Experiment with bass lines, melody lines, and chordal accompaniments to create a full and rich sound.
8. Ear Training
Developing your ear is essential for country musicians to play by ear, improvise, and collaborate with other musicians effectively. Practice identifying chord progressions, melodies, and harmonies by ear to enhance your musical understanding and intuition. Use ear training exercises, such as interval recognition and chord identification, to sharpen your listening skills and musical memory. Transcribe country songs and solos by ear to improve your musical vocabulary and phrasing.
9. Speed and Accuracy Exercises
Building speed and accuracy on the guitar is essential for country musicians to perform fast-paced licks and solos with precision. Practice scales, arpeggios, and exercises that focus on developing speed, agility, and control. Use a metronome to gradually increase your playing speed while maintaining accuracy and clarity. Focus on alternate picking, hammer-ons, pull-offs, and other techniques to improve your dexterity and fluency on the guitar.
10. Music Theory Fundamentals
Understanding music theory is crucial for country musicians to communicate, collaborate, and compose effectively. Study basic music theory concepts, such as scales, chords, and progressions, to deepen your understanding of harmony and melody. Learn how to construct chord voicings, improvise over chord changes, and analyze song structures to enhance your musical knowledge and creativity. Apply music theory principles to your playing to expand your musical horizons and develop your unique country music style.
11. Tone and Effects Exploration
Exploring different tones and effects is essential for country musicians to create a signature sound and atmosphere. Experiment with various guitar tones, including clean, twangy, and overdriven sounds, to find the tone that best suits your playing style. Use effects pedals, such as reverb, delay, and compression, to enhance your guitar sound and add depth to your playing. Focus on tone shaping and dynamics to create a personalized and expressive guitar tone that complements your country music style.
12. Performance Preparation
Preparing for performances is essential for country musicians to deliver confident and engaging live shows. Practice playing along to backing tracks, jamming with other musicians, and performing in front of an audience to build your stage presence and confidence. Focus on communication with bandmates, audience interaction, and overcoming performance anxiety to ensure a successful and memorable performance. Rehearse your setlist, transitions, and stage presence to deliver a polished and professional performance that showcases your skills as a country musician.
Looking to enhance your guitar playing skills for country music? Check out our articles on hybrid picking exercises, alternative string materials, budget pedals, and humidifiers for acoustic guitars to take your country music playing to the next level!
Conclusion
In conclusion, mastering essential guitar exercises is crucial for country musicians to develop their technique, enhance their playing, and refine their musicality. By incorporating fingerpicking patterns, hybrid picking, bending and vibrato, chord progressions, slide guitar techniques, rhythm exercises, fingerstyle techniques, ear training, speed and accuracy exercises, music theory fundamentals, tone and effects exploration, and performance preparation into your practice routine, you can elevate your guitar playing to new heights and achieve success as a country musician. Remember to practice consistently, stay motivated, and always strive for improvement to become the best guitarist you can be in the world of country music.