As guitarists, we all have different techniques, styles, and setups that contribute to our unique sound. One commonly overlooked aspect of guitar tone is the pedal order. You might be wondering, “What does pedal order even mean?” Simply put, pedal order is the arrangement of your guitar pedals in a specific sequence to produce the optimal sound. If you’ve ever experienced a lackluster tone, it’s likely due to poor pedal order. Don’t worry, though – understanding the basics of signal chain and implementing a well-thought-out pedal order can take your sound to new heights. In this article, we’ll guide you through the process of arranging your pedals step-by-step, from the basics to advanced techniques. So, let’s dive in and explore the world of pedal order and how it can enhance your guitar sound.
What is Pedal Order?
As a guitar player, you’ve probably invested in a variety of guitar pedals to create unique and personalized sounds for your music. However, the order in which you place these pedals can make all the difference in achieving the optimal sound. The way you arrange your pedals affects the interaction between them, which in turn affects your final sound. Whether you’re a fan of /country-wah-pedals/ or seeking the perfect boost for your /boost-vs-overdrive-for-country-music/, understanding pedal order basics can help transform your tone. Before you start building out your pedalboard or diving into /top-10-pedals-country-guitar/, let’s explore how pedal order works and why it matters.
Understanding Signal Chain Basics
When it comes to arranging your guitar pedals, it’s important to understand the basics of signal chain. The signal chain refers to the order in which your guitar signal flows through your pedals, and it can have a big impact on your final sound.
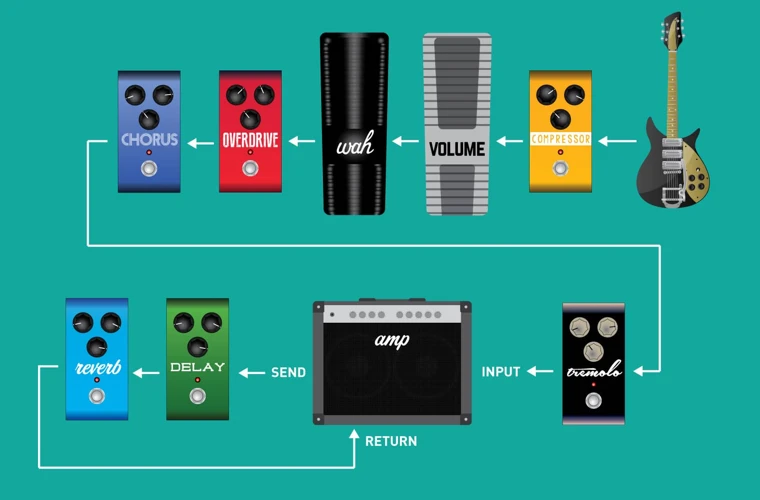
At its most basic level, the signal chain follows this order:
| Pedal Type | Placement |
|---|---|
| Tuner | First in the chain |
| Gain pedals (overdrive, distortion, fuzz) | Next in the chain |
| Modulation pedals (chorus, phaser, flanger) | After gain pedals |
| Time-based pedals (delay, reverb) | After modulation pedals |
| Volume pedal or EQ | Last in the chain before the amp |
But why does the signal chain matter?
Each pedal can impact the sound of the previous pedal in the chain, as well as the overall sound. For example, placing a distortion pedal after a delay pedal will result in a different sound than placing the delay after the distortion.
It’s also important to consider the order based on what you want to emphasize in your playing. If you want to showcase your gain pedals, placing them early in the chain will give them more emphasis. On the other hand, if you want to emphasize your time-based effects, placing them early in the chain will make them more prominent.
It’s important to note that there is no one-size-fits-all solution to pedal order. While the basic signal chain serves as a guideline, there are plenty of exceptions and variations based on personal preference and style. So, it’s always a good idea to experiment and find what works best for you and your sound.
For country guitarists looking to build their pedalboard, understanding the basics of signal chain can help you choose the right pedals for your setup. Additionally, learning how to build your own pedals or modify existing ones can be a great way to personalize your setup to your specific needs. For more information on these topics, check out budget pedals for country guitar.
Basic Guitar Pedal Order
As you dive into the world of guitar pedals, it’s essential to understand the proper placement of your effects pedals for the best sound possible. The order of your pedals can make a significant contribution to your tone and can impact the clarity and quality of your guitar sound. Once you have a guitar pedalboard set up, it’s time to figure out the right sequence to get your desired effect. In this section, we will explore the basic guitar pedal order and the different types and effects of the pedals. Whether you’re just starting or looking to improve your existing pedalboard, understanding the right placement for each of your pedals is crucial for optimal sound. Let’s dive in and see what we can learn!
Tuner
When arranging your pedalboard, the tuner should be your first pedal. This pedal helps you tune your guitar, and having it at the front of the signal chain ensures that all other pedals are accurately tuned. Additionally, it allows you to easily mute your guitar when switching between different pedals or making adjustments between songs.
When selecting a tuner pedal, consider one that mutes your guitar signal while tuning, so the audience doesn’t hear tuning noises. Pedals like the TC Electronic Polytune or BOSS TU-3 not only provide accurate tuning but also have this feature.
It’s worth noting that in some cases, a tuner pedal can also function as a clean boost pedal. When placed at the beginning of the signal chain, it can boost the volume of your guitar signal before it passes through any other effects.
Positioning the tuner pedal first in your signal chain is conventional and will serve you well. You can also experiment with placing the tuner after other pedals for unique sounds, but having it at the front guarantees you a more accurate pitch.
If you’re interested in learning more about guitar pedals in country music, we have a great article on guitar pedals in country music. If you’re starting from scratch with a pedalboard, check out our guide on how to build a pedalboard for country music. For country guitar players who are looking for some fuzz, check out our article on the best country guitar fuzz pedals.
Gain Pedals
When it comes to guitar pedals, gain pedals are an essential tool for any guitarist looking to add some crunch to their sound. These types of pedals are designed to add distortion or overdrive to your guitar’s signal, giving your tone more character and depth. There are several different types of gain pedals available, each with their own unique sound and application.
One of the most popular types of gain pedal is the overdrive. This type of pedal is designed to simulate the natural breakup of a tube amp, producing a smooth and warm overdriven tone. Overdrive pedals are often used by blues and rock guitarists who want to add some grit to their playing without sacrificing clarity or dynamics.
Another type of gain pedal is the distortion pedal. This pedal produces a more aggressive and pronounced distortion sound, perfect for heavy metal and hard rock genres. Distortion pedals often have a higher gain level than overdrive pedals, allowing for a more compressed and saturated sound.
Finally, there are fuzz pedals. These pedals produce a thick and fuzzy distortion sound, reminiscent of the classic garage rock and psychedelic sounds of the 60s and 70s. Fuzz pedals have a very distinct and unique sound, making them a favorite among experimental and alternative guitarists.
To help you decide where to place your gain pedals in your signal chain, we’ve created a handy table to outline the optimal order for your pedals.
| Pedal Type | Placement |
| Wah Pedal | Before gain pedals |
| Boost Pedal | Before gain pedals |
| Overdrive Pedal | Before distortion pedals |
| Distortion Pedal | Before modulation pedals |
| Fuzz Pedal | First in chain or after a volume pedal |
Remember, this table is just a guideline, and experimentation is key to finding your ideal signal chain. Don’t be afraid to mix and match pedal types and placements to create your own unique sound.
Modulation Pedals
Modulation pedals are essential to add texture and depth to your guitar tone. These pedals work by altering the frequency and amplitude of the signal, creating captivating sounds that can enhance your music. There are various types of modulation pedals, each with its unique sound, meant to provide varied tonal colors.
Some of the most common modulation pedals include chorus, phaser, and flanger. Here is a breakdown of how each of these pedals should be placed in a pedal chain:
| Pedal Type | Placement |
|---|---|
| Chorus | Before any delay/reverb pedals |
| Phaser | Before or after distortion pedals |
| Flanger | Before or after distortion pedals |
Chorus: This pedal produces a shimmering effect, which can be subtle or dramatic, depending on how it’s used. It works by dividing your guitar’s signal and adding a slight delay to one of the signals before recombining them. The result is a rich and full tone that can add depth and warmth to your sound. Place chorus pedal before any delay or reverb pedals, giving it the chance to enhance the trails.
Phaser: This pedal modulates the phase of the guitar’s signal, producing a sweeping sound. It’s often used to create spacey and atmospheric sounds. Phaser pedals can be placed before or after distortion pedals, depending on the desired effect. Placing it before distortion will produce a subtler effect, while putting it after will create a more pronounced phasing effect.
Flanger: This pedal is similar to a phaser but produces a more pronounced swirling sound. It works by delaying the sound signal and then combining it with the original signal, thus creating a comb filter effect. Like the phaser, a flanger pedal’s placement can alter the effect slightly. Placing it before distortion creates a subtle whooshing effect, while putting it after can produce a more extreme sound.
Experimentation is the key to finding the perfect order for modulation pedals. You may even find that a different pedal order produces interesting and unexpected sounds that can be used in different contexts.
Time-Based Pedals
When it comes to the pedal order, the placement of time-based pedals is crucial for getting the most optimal sound out of your guitar. These pedals include delay, reverb, and chorus, and they all work by manipulating the signal after it has been distorted by the gain pedals.
Here are some key things to keep in mind when ordering your time-based pedals:
- Delay pedals usually come before reverb pedals. This is because if the reverb comes before the delay, it will be harder to hear the individual echoes created by the delay due to the sound already being reverb-soaked.
- Chorus pedals typically come after delay and reverb pedals. This is because chorus pedals work best with a clean signal, and placing them after the delay and reverb ensures that the chorus effect is applied to the entire signal.
- If you’re using multiple time-based pedals in your setup, try experimenting with different orders to see what sounds best to you.
Additionally, here are some tips for getting the most out of your time-based pedals:
- Adjust the level and tone controls on your delay and reverb pedals to ensure that they complement each other and don’t clash in the mix.
- Consider using the tap tempo feature on your delay pedal to sync up the tempo of your delay with the tempo of the song.
- Adjust the depth and rate controls on your chorus pedal to get the desired effect. Too much chorus can make your guitar sound washy and indistinct, while too little may not be noticeable enough.
Remember, there is no single “correct” way to order your pedals. It’s all about experimentation and finding the combination that works best for you and your sound. By understanding signal chain basics and considering the tips provided here, you’ll be well on your way to achieving the perfect pedal order for your guitar setup.
Volume Pedal or EQ
Once you’re done adding your time-based pedals, it’s time to take a look at the volume pedal or EQ. Although you might be tempted to put it near the beginning of your chain, it’s better to place it towards the end.
Here’s why: if you place it at the beginning, it affects the signal level of all the other pedals in your chain, which may not be desirable. By placing them towards the end, you can adjust the overall volume of your guitar without affecting the tone.
If you’re using a volume pedal, it’s simple to understand its function. You can either reduce the volume or increase it with the pedal. On the other hand, an EQ pedal allows you to selectively adjust different frequencies within your signal to create a more personalized and unique sound.
When it comes to the placement of the volume pedal or EQ, there are no hard and fast rules. Some players prefer placing the EQ pedal before the amplifier to shape the tone of the signal before it gets amplified. Others prefer to put it at the end of the chain so that they can fine-tune the sound that will come out of their amp.
No matter what you choose, make sure to experiment with different placements and find out what works best for you. This will be a personal preference based on your playing style, musical genre, and the equipment you are using.
Here are some tips when choosing the right volume pedal or EQ for your pedalboard:
- Look for pedals that are true bypass to avoid signal degradation when they’re not in use.
- Choose a volume pedal that has a smooth and even sweep, and doesn’t suck up your tone when used
- Consider an EQ pedal that has a wide range of frequencies to play with and different filter types.
Remember, the placement of your volume pedal or EQ within your signal chain is essential to achieving the desired sound. So, take the time to find what works best for you and your musical vision.
Advanced Pedal Order
Once you have a basic understanding of pedal order in your guitar rig, you can start to experiment with more advanced configurations to achieve your desired sound. This is where creativity meets technicality, and where the pedals you select can truly shine. By incorporating different types of pedals and mixing them in unique ways, you can take your playing to the next level. So, let’s dive in and explore some advanced pedal order setups to help you unlock your full potential on the guitar.
Adding and Mixing Pedals
When it comes to adding and mixing pedals, there are endless possibilities that can shape the sound of your guitar. Here are some tips to help you get the most out of your pedalboard:
- Experiment: Don’t be afraid to try new combinations and pedal orders. Mix and match different effects pedals to create unique sounds that suit your style.
- Keep it simple: While it’s tempting to add more pedals, keep in mind that each addition affects your overall tone. Start with a few essential pedals and build from there.
- Arrange by effect type: Group pedals together by effect type to make it easier to switch between effects.
- Consider the order: Keep in mind the basic pedal order of tuner, gain, modulation, time-based, and volume/EQ pedals. But, don’t be afraid to experiment with breaking the “rules.”
- Use a loop switcher: A loop switcher allows you to group pedals together and switch them on or off together, making it easier to create different sounds on the fly.
By keeping these tips in mind, you can create a pedalboard that enhances your sound and inspires your creativity. Remember, the pedal order is just the beginning – the possibilities are endless when it comes to shaping your sound.
Wah and Volume Pedal Placement
When it comes to placing your wah and volume pedals in your signal chain, there are a few things to consider. One common placement is to put the wah pedal right after the gain pedals, but before any modulation or time-based pedals. This allows the wah to shape the tone of the overdriven signal, giving a more expressive and dynamic sound.
However, some guitarists prefer to put the wah pedal after the modulation pedals, as the wah can emphasize the effects of chorus or phaser pedals. You can experiment with both placements to see which one works best for you and your playing style.
As for the volume pedal, it’s often placed at the end of the signal chain, but you could also consider putting it before any reverb or delay pedals. This can prevent the decay of these effects from getting cut off abruptly when you use the volume pedal to decrease the volume.
Another option is to use a volume pedal as an expression pedal, for example, to control the rate of a tremolo or the feedback of a delay pedal. In this case, you would place the volume pedal directly after the pedal you want to control.
To summarize, the placement of the wah and volume pedals in your signal chain is a matter of personal taste and experimentation. Here is an example table of different placement options for the wah and volume pedals:
| Signal Chain Placement: | Effects: |
| Wah -> Gain pedals -> Modulation pedals -> Time-based pedals -> Volume pedal | Dynamic, expressive overdrive tones |
| Gain pedals -> Wah -> Modulation pedals -> Time-based pedals -> Volume pedal | Wah emphasizes chorus/phaser effects |
| Gain pedals -> Modulation pedals -> Wah -> Time-based pedals -> Volume pedal | Wah emphasizes modulation effects |
| Gain pedals -> Modulation pedals -> Time-based pedals -> Volume pedal -> Reverb/Delay pedals | Decreased volume doesn’t cut off decay of reverb/delay |
| Volume pedal -> Pedal to control (e.g. tremolo, delay) -> Modulation pedals -> Gain pedals | Volume pedal used as expression pedal |
No matter where you place your wah and volume pedals, remember that there’s no right or wrong way to arrange your signal chain. Experimentation and personalization are key to finding your optimal sound.
Wet-Dry Pedal Setups
When it comes to arranging your guitar pedals, one layout to consider is the wet-dry pedal setup. This allows you to have separate control over the dry (unaffected) and wet (affected) signals, creating a more dynamic and customizable sound. Here are a few ways to set up a wet-dry pedal arrangement:
- Parallel Processing: This type of wet-dry setup splits your guitar signal into two paths: one goes through the effect pedals while the other remains dry. The resulting sounds are then blended together at the output. This allows you to maintain the clarity of your dry tone while adding effects to your liking.
- A/B/Y Switches: With this wet-dry pedal setup, you can have two different signal paths going to different signal chains. You can switch between the two using an A/B/Y box, allowing you to have one chain with no effects and another with all of your desired effects. This gives you the ability to toggle between completely dry and fully affected tones.
- Splitting Frequencies: If you’re looking to add effects like distortion or overdrive to your sound while also keeping your clean tone clean, consider splitting your signal by frequency. A high-pass filter will send only the high frequencies to the effect pedals, while the low frequencies remain dry. This way, you can have a dirty, gritty sound layered on top of a clean, clear tone.
A wet-dry pedal setup adds a lot of versatility to your sound, but it does require more pedals and cables than a traditional setup. It’s important to use quality cables and a reliable power source to avoid any unwanted noise or interference. Experiment with different configurations and see what works best for you and your playing style.
Other Considerations
As you hone your guitar pedal order to perfection, there are other factors to consider that can greatly impact your sound. These additional considerations range from technical aspects like noise reduction pedals and power supply issues, to more subjective factors such as experimentation and finding your own unique sound. Let’s dive into these final elements that could make all the difference in achieving the ultimate pedal arrangement.
Noise Reduction Pedals
Are you tired of hearing hissing, buzzing and other annoying sounds on your guitar amp? If yes, then noise reduction pedals might be the solution you need. This type of pedal helps to reduce unwanted noise and hum caused by other pedals or other electrical interference.
In addition to reducing noise, they also help to maintain your guitar’s signal integrity, ensuring that your sound remains as clear as possible.
Some of the popular noise reduction pedals include the ISP Technologies Decimator II and BOSS NS-2 Noise Suppressor.
It’s important to note that while noise reduction pedals are effective, they can also impact your tone. Thus, it’s advisable to experiment with different settings and placements until you find the optimal sound.
To use a noise reduction pedal, place it towards the end of your signal chain, right before your amp. This ensures that it can effectively filter out any noise from other pedals.
Table below summarises key features of some popular noise reduction pedals:
| Noise Reduction Pedal | Key Features |
|---|---|
| ISP Technologies Decimator II | • High-quality noise reduction • Stereo output • Input threshold adjustment |
| BOSS NS-2 Noise Suppressor | • Mute function for silent tuning • Input/output level knobs for adjusting sensitivity • Includes send/return for a loop setup |
| TC Electronic Sentry | • Multi-band noise gating • TonePrint support for customization • True bypass for unaltered tone |
Adding a noise reduction pedal to your pedalboard can do wonders in improving the sound quality of your guitar playing. Experiment with different settings and placements to find the perfect balance between noise reduction and overall sound quality.
Power Supply and Ground Loops
Ensuring you have a proper power supply is crucial when arranging your guitar pedals for optimal sound. Using a daisy chain can cause unwanted noise and hum, which is known as a ground loop. To avoid this issue, consider using a pedalboard power supply that isolates each pedal’s power source. This can help eliminate unwanted noise and allow your pedals to sound their best.
Here are some things to consider when it comes to power supply and ground loops:
- Invest in a high-quality power supply that can handle the voltage and amperage needs of your pedals.
- Avoid using a daisy chain to power your pedals as this can lead to ground loops and unwanted noise.
- Consider using a power supply that isolates each pedal’s power source. This can help eliminate ground loops and improve sound quality.
- Make sure you are using the correct power cables for each pedal as using the wrong cable can cause damage to your pedals or power supply.
- Ground loops can also occur when pedals are plugged into different outlets or power sources. To avoid this, try to keep all pedals plugged into the same power strip or outlet.
By taking these steps to ensure proper power supply and avoiding ground loops, you can help your pedals sound their best and avoid unwanted noise or hum.
Experimentation and Personalization
As with any aspect of playing the guitar, experimentation and personalization are key factors in finding the perfect pedal order for your individual sound. There is no “right” way to arrange your pedals; it all comes down to your personal preference and playing style.
One important factor to consider when experimenting with pedal order is the type of music you play. For example, if you primarily play heavy metal, you may want to place your distortion pedals at the front of your signal chain. Conversely, if you play clean, ambient music, placing time-based pedals such as delay and reverb at the end of the chain can create a lush, ethereal sound.
Another factor to consider is the order in which you stack multiple pedals of the same type. For example, if you have multiple distortion pedals, try placing the pedal with the lower gain setting first in the chain, followed by the pedal with the higher gain setting. This can help to prevent your tone from becoming too muddy or indistinct.
Using an A/B switcher can also be helpful in experimenting with pedal order. This allows you to quickly switch between two different signal chains in real-time, making it easy to compare the differences between arrangements.
Finally, don’t be afraid to think outside of the box and try unconventional pedal orders. Some guitarists have found success by placing time-based pedals at the beginning of their signal chain, or even using a feedback loop to place a time-based pedal before and after a distortion pedal for a unique sound.
| Factors to Consider When Experimenting with Pedal Order |
|---|
| Type of music played |
| Order of stacked pedals |
| Using an A/B switcher |
| Trying unconventional pedal orders |
By taking the time to experiment with different pedal orders and arrangements, you can discover a sound that is uniquely your own. So grab your pedals, plug in your guitar, and start exploring the endless possibilities of pedal order!
Conclusion
After going through this guide, it should be clear that pedal order truly does matter when it comes to achieving optimal sound from your guitar pedals. Whether you’re a beginner or advanced player, understanding signal chain basics and the different order options for your pedals can make a substantial difference in the quality of your sound.
Remember, always start with a reliable tuner, and place your gain pedals first in the chain to ensure a proper foundation for your sound. Modulation and time-based pedals can then be added in the best order for the style of music you’re playing.
Don’t be afraid to experiment with different arrangements to find the sound that works best for you. Consider using noise reduction pedals to clean up any excess noise, and beware of power supply and ground loop issues.
In the end, pedal order is a critical element of shaping your sound and making your guitar playing experiences as enjoyable and professional as possible. By following the tips outlined in this guide, you’ll be well on your way to achieving the sound you’ve always wanted from your guitar pedals. Happy jamming!
Frequently Asked Questions
1. What is the best order to arrange guitar pedals?
The ideal order for arranging guitar pedals is tuner, gain pedals, modulation pedals, time-based pedals, and volume or EQ pedals.
2. Can I switch up the order of my guitar pedals?
Yes, you can experiment with different orders to achieve unique sounds, but it’s recommended to start with the basic pedal order.
3. Where should I place my Wah pedal?
It’s best to place the Wah pedal before the gain pedals in your signal chain.
4. Should I use a Noise Reduction Pedal?
If you’re experiencing unwanted signal noise, a noise reduction pedal can be useful.
5. Do I need a power supply for my pedals?
Yes, using a power supply will ensure that your pedals are receiving constant and reliable power.
6. Can I mix different brands of guitar pedals?
Yes, you can mix different brands of pedals. It’s all about finding the combination that works best for you.
7. Should I use a Wet-Dry Pedal Setup?
A Wet-Dry Pedal Setup can create a broader and more complex sound. It’s worth experimenting with to see if it works for you.
8. Can I use my volume pedal as an EQ?
While a volume pedal can affect your tone, it’s not a replacement for an EQ pedal.
9. Do I need a ground loop isolator?
If you’re experiencing hum or buzzing from your pedals, a ground loop isolator can help resolve the issue.
10. What’s the best way to personalize my pedalboard?
Experiment with different pedal combinations, placement, and order to find the sound that you’re looking for.