You’ve probably heard it said countless times that tone is everything when it comes to playing country guitar. But have you considered that a relatively simple DIY pedal mod might completely transform your sound? There’s a reason why so many guitarists swear by customization as a means of achieving their own unique sound. It’s time to take your sound into your own hands with these easy-to-follow DIY pedal mods designed specifically for country guitarists. From simple capacitor swaps to more advanced mid-boosts, this guide will show you how to enhance your tone and create a sound that’s truly your own. So, plug in your guitar, grab your pedal, and let’s get started!
The Benefits of DIY Pedal Mods
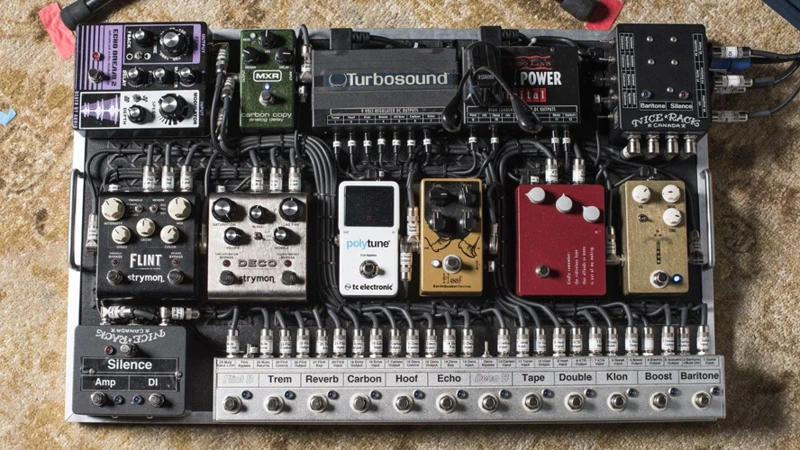
Exploring the world of DIY pedal mods can seem daunting at first, especially if you’re unfamiliar with the inner workings of guitar pedals. But the benefits of taking on this challenge are numerous and well worth the effort. From cost-effective customization to valuable learning experiences, DIY pedal mods offer a plethora of advantages for country guitarists looking to enhance their tone. Plus, with the right guidance and a bit of creativity, this endeavor can be a lot of fun. So, put on your thinking cap, grab your tools, and let’s dive into the benefits of DIY pedal mods for country guitarists. Are you looking for the perfect guitar pedals to experiment with? Check out our article on the top 10 pedals for country guitarists.
1. Cost-Effective
One of the primary benefits of DIY pedal mods is how cost-effective they can be. Instead of shelling out hundreds of dollars for brand new pedals, guitarists can buy used or inexpensive pedals and modify them to fit their unique tone preferences. Take a look at the following table for an idea of some popular pedals for country guitarists and their price range:
| Pedal | Price Range | Link to Recommended Pedal |
|---|---|---|
| Overdrive Pedals | $50-$200 | Boost vs. Overdrive for Country Music |
| Compression Pedals | $60-$300 | Top 10 Pedals for Country Guitar |
| Delay Pedals | $50-$250 | Delay Pedals for Country Music |
| Reverb Pedals | $60-$300 | How to Build a Pedalboard for Country Music |
As shown in the table, the price range for each pedal type can vary quite a bit, but even the least expensive options can provide a great foundation for mods. With a little bit of skill and some research, guitarists can enhance their tone with DIY pedal mods without breaking the bank.
2. Customization
One of the major benefits of DIY pedal mods for country guitarists is customization. By modifying your pedals, you can create a unique sound that sets you apart from other guitarists. You can also tweak your pedals to match your own personal preferences and style.
There are several ways to customize your pedals. Some guitarists choose to switch out different components within the pedal, such as resistors, capacitors, and op-amps. Others prefer to modify the tone control or add a mid-boost to enhance certain frequencies.
Another popular customization option is to swap out the original knobs for something more visually appealing or functional. For example, you may choose to replace standard knobs with custom knobs that are easier to grip or that have a unique appearance.
To help you get started with customizing your pedals, we’ve created a table that outlines some common customizations and their potential effects on your tone.
| Modification | Potential Effects on Tone |
|---|---|
| Replacing capacitors | Can affect the frequency response of your pedal, yielding a brighter or warmer tone |
| Adjusting resistors | Can alter the gain or bias of your pedal, producing a cleaner or dirtier signal |
| Adding a treble bleed circuit | Helps to retain high-end frequencies when rolling back your guitar’s volume knob |
| Swapping op-amps | Affects the overall sound quality and clarity of your pedal |
| Modifying tone control | Allows for greater control over the tonal characteristics, such as brightening or darkening the tone |
| Adding a mid-boost | Enhances mid-range frequencies, producing a more prominent and cutting tone |
Keep in mind that customizing your pedals does require some technical knowledge and experience with soldering and electronics. However, there are plenty of online resources and forums that can help guide you through the process.
By exploring different customizations, you can truly make your guitar sound unique and tailor it to your own personal style. To further enhance your pedal collection, consider investing in specialized country guitar fuzz pedals, country wah pedals, or exploring the proper pedal order Matters Guitar Pedals. You don’t need to break the bank, as budget pedals for country guitar can more than suffice!
3. Learning Experience
Undertaking DIY pedal mods isn’t just a way to save money or customize your tone, it can also be a valuable learning experience for any country guitarist. Modifying pedals may seem intimidating at first, but with the right guidance and tools, it can be a fun and rewarding process.
One of the biggest benefits of modifying your own pedals is gaining a deeper understanding of how they actually work. By dissecting your pedals, you can learn about the different components that make up their circuitry and how they interact with one another. This can give you a better idea of how to achieve specific tonal qualities that you’re aiming for.
| Advantages of Learning Through DIY Pedal Mods | How it Helps Your Music Career |
|---|---|
| Hands-on experience with electrical engineering | Improves your overall understanding of music technology |
| Stronger understanding of signal flow and schematics | Gain insights in how different pedals interact with one another |
| Develop soldering and troubleshooting skills | Helps you solve issues with your own gear, and improve other musicians’ pedals too |
| Learn to identify faulty or broken pedals | Ensures your pedals are in optimal condition for your performances |
Additionally, DIY pedal mods can help you to solve any issues that you may have with current pedals or help to uncover new and unique sounds. Not to mention, if you’re keen to work in the industry, having a deep understanding of music technology is a valuable skill that can set you apart from other musicians.
By embracing a DIY mentality and committing to learning through pedal mods, you can really elevate your music career and create a unique and custom sound that separates you from the competition. So, whether you’re a beginner or an experienced country guitarist, give DIY pedal mods a try and see how they can help you enhance your tone and improve your music career. Don’t forget to visit our article about guitar pedals in the country music.
Choosing the Right Pedals for Mods
When it comes to doing pedal mods, not all pedals are created equal. Choosing the right pedals for mods can make or break the success of your project. So, how do you know which pedals are best to work with? While there are plenty of pedals out there that can benefit from some tweaking, overdrive pedals, compression pedals, delay pedals, and reverb pedals are some of the most common types of pedals that country guitarists tend to mod. Each of these types of pedals has unique features that can be enhanced through modifications, making them a great place to start for any aspiring DIY pedal modder.
1. Overdrive Pedals
When it comes to choosing pedals for mods, overdrive pedals are a popular choice for country guitarists. These pedals are designed to simulate the sound of an overdriven tube amplifier, which is a key component of the classic country tone. Here are some popular overdrive pedals that you may consider for your mods:
| Brand | Model | Description |
| Fulltone | OCD | A versatile overdrive with a wide range of gain and tone options |
| Ibanez | Tubescreamer | A classic overdrive with a mid-focused tone |
| Boss | Blues Driver | A smooth and warm overdrive with a focus on low-end |
| MXR | Sugar Drive | An overdrive with a transparent and dynamic tone |
No matter which overdrive pedal you choose, there are several mods that can enhance its performance and tone. From swapping out the capacitors to modifying the tone control, these mods will allow you to customize your pedal and achieve your ideal country guitar sound.
2. Compression Pedals
Compression pedals are a must-have for country guitarists looking to enhance their tone. They are designed to help smooth out the sound of your playing, making each note more even in terms of volume. Here are some popular compression pedals that are perfect for mods:
| Brand | Model | Description |
|---|---|---|
| MXR | Dyna Comp | The Dyna Comp is a classic compressor pedal that has been used by country guitarists for decades. It features a simple two-knob design and produces a warm, vintage tone. |
| Keeley | Compressor Plus | The Compressor Plus is a versatile compressor that can accommodate a wide range of playing styles. It features a four-knob design that allows for more precise control over the compressed signal. |
| Origin Effects | Cali76 Compact Deluxe | The Cali76 Compact Deluxe is a high-end compressor that produces studio-quality tones. It features a six-knob design and a side-chain high-pass filter that allows for even more control over the compressed sound. |
When it comes to modding compression pedals, there are a few things you can do to improve their performance. One popular mod is to replace the stock op-amp with a higher-quality one. This can help to reduce noise and improve the overall clarity of the compressed signal.
Another mod is to add a blend knob, which allows you to mix the compressed signal with the dry signal. This can help to maintain the dynamic range of your playing while still reaping the benefits of compression.
3. Delay Pedals
When it comes to enhancing your country guitar tone, delay pedals can be a crucial component in creating a unique and dynamic sound. Delay pedals create an echo effect by adding a delayed signal to your guitar’s original signal, giving your sound an added depth and complexity.
There are a few things to keep in mind when selecting a delay pedal for your pedal mods. When shopping for a delay pedal, it’s important to consider the pedal’s delay time, feedback, and modulation capabilities. A longer delay time will allow you to create richer, more complex soundscapes, while a higher feedback setting can create interesting and unique self-oscillation effects. Modulation capabilities, such as chorus or vibrato, can also add a unique character to your sound.
Below, we’ve compiled a table of popular delay pedals that are well-suited for country guitarists, along with their delay time and feedback range.
| Delay Pedal | Delay Time Range | Feedback Range |
|---|---|---|
| Boss DD-7 | 1ms to 6400ms | 0% to 100% |
| TC Electronic Flashback 2 | 8ms to 7 seconds | 0% to 100% |
| Electro-Harmonix Canyon | 5ms to 3 seconds | 0% to infinite |
| Strymon Timeline | 30ms to 3000ms | 0% to 100% |
Once you’ve chosen a delay pedal to work with, there are a few easy mods you can try. One simple mod is to replace the delay pedal’s stock footswitch with a sturdier, more durable switch. This can help ensure that your pedal will hold up to regular use and perform reliably.
Another easy mod is to adjust the pedal’s delay time range. Most delay pedals allow you to adjust the delay time within a certain range, but you can often modify the pedal to allow for longer or shorter delay times. This can give you more flexibility in adjusting your sound and creating unique effects.
If you’re feeling more adventurous, there are also advanced delay pedal mods you can try. For example, adding a “tape age” control to your delay pedal can simulate the sound of a vintage tape delay, giving your sound a warm, natural character. You can also consider adding an external tap tempo switch, which will allow you to set the delay time with precision and accuracy.
By selecting the right delay pedal and experimenting with different mods, you can create a rich, dynamic sound that perfectly complements your country guitar playing.
4. Reverb Pedals
Adding a reverb pedal to a country guitarist’s pedalboard can give their tone some much-needed depth and ambiance. Reverb pedals simulate the sound of a room or space, adding dimension to the sound of the guitar. There are several types of reverb pedals available on the market, each offering a unique sound.
Here is a table that breaks down the different types of reverb pedals and what they offer:
| Type of Reverb Pedal | Description |
| Spring reverb | Simulates the sound of a spring reverb unit found in older amplifiers. It produces a bright and lively sound that suits well for country music. |
| Hall reverb | Creates a big and atmospheric sound, simulating the sound of being in a concert hall. Great for slow ballads or reflective pieces. |
| Plate reverb | Offers a smooth and even sound, as if the guitar is being played in a studio with professional production. Perfect for recording sessions. |
| Room reverb | Simulates the sound of a small room, like a club venue. It creates a warm and intimate sound that is perfect for live performances. |
No matter what type of reverb pedal a country guitarist chooses, it is important to experiment with the settings to find the perfect sound. Adjusting the decay, tone, and mix controls can drastically affect the sound and atmosphere of the reverb. Whether a country guitarist chooses a spring, hall, plate, or room reverb pedal, adding this effect to their pedalboard can elevate their tone and add dimension to their playing.
Easy DIY Pedal Mods for Country Guitarists
So, you’ve decided to take your country guitar playing to the next level and enhance your tone through pedal mods? Congratulations! It’s a bold move, but one that will surely pay off in the long run. However, the idea of modifying your beloved pedals might seem daunting, especially if you’ve never done it before. But fear not, as there are easy DIY pedal mods that even a beginner can tackle with minimal difficulty. Let’s delve into some straightforward modifications that can make a significant impact on your sound.
1. Switch Up Your Capacitors
Capacitors are a vital component in guitar pedals, affecting the signal flow and ultimately, the tone. By switching up your capacitors, you can enhance your country guitar sound easily and cost-effectively. Here are some easy steps to switch up your capacitors:
- Step 1: Open up your pedal and locate the capacitor you want to switch out. This could be a coupling capacitor or a tone capacitor.
- Step 2: Remove the old capacitor using a soldering iron and desoldering pump. Be sure to make note of the capacitance and voltage rating of the old capacitor.
- Step 3: Choose a new capacitor with a different capacitance value and/or voltage rating. Opt for a higher value capacitor to get a brighter tone or a lower value capacitor to decrease the brightness.
- Step 4: Solder the new capacitor in place of the old one. Remember to match the polarity of the new capacitor with the old one.
- Step 5: Close up the pedal and test out your new tone!
Switching up your capacitors is a budget-friendly way to customize your tone to your liking. Experiment with different capacitor values to find the perfect sound for your country guitar playing. By understanding the effect capacitors have on your signal flow, you can take the first step in modifying your pedals and creating a unique sound that sets you apart from the rest.
2. Adjust Your Resistors
Adjusting resistors is another easy way to add your own touch to your pedals. Resistor values can affect everything from gain levels to tone shaping, and swapping them out for different values can create a unique sound that suits your playing style. Before making any changes, it’s important to understand the role of resistors in your pedal’s circuitry.
Resistors come in different ohm values, and their purpose is to restrict the flow of electrical current in a circuit. By adding or removing resistance, you can alter the behavior of the circuit and change the way your guitar signal interacts with the pedal. Here are some suggested resistor modifications to consider:
| Resistor Modification | Description |
|---|---|
| Reducing input resistor value | Decreases the amount of high-frequency loss, resulting in a brighter tone. |
| Increasing feedback resistor value | Increases the amount of gain and sustain, producing a more distorted sound. |
| Decreasing feedback resistor value | Reduces the amount of gain and sustain, producing a cleaner sound. |
| Changing tone control resistors | Adjusts the frequencies affected by the tone knob, allowing for more precise tone shaping. |
It’s important to note that changing resistor values can have unintended consequences and can potentially damage your equipment if done improperly. Always research and consult with professionals before attempting any modifications.
Adjusting resistors is a cost-effective way to experiment with your pedal’s sound and test out different components without breaking the bank. By making small adjustments and playing around with different values, you can achieve a personalized sound that complements your unique playing style.
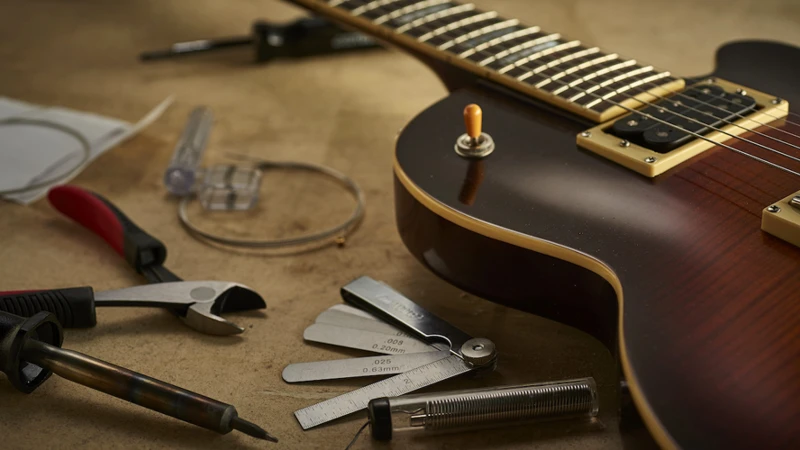
3. Add a Treble Bleed Circuit
Many guitarists face a common problem when playing their instruments – as they roll back the volume knob, the tone changes and becomes muddled. This can be particularly frustrating for country guitarists who rely on a clear, bright tone. Fortunately, there’s a simple and cost-effective solution to this issue – adding a “Treble Bleed” circuit to your guitar’s volume knob.
What is a Treble Bleed Circuit?
A treble bleed circuit (sometimes referred to as a “high-pass filter”) is a simple modification that allows high frequencies (treble) to bypass the volume potentiometer on your guitar. This allows the treble frequencies to be maintained even as the volume is rolled back, resulting in a much clearer tone.
How to Add a Treble Bleed Circuit
Adding a treble bleed circuit is a relatively simple DIY project that can be completed with just a few components. Here’s what you’ll need:
| Component | Value |
|---|---|
| Resistor | 100kΩ |
| Capacitor | 0.001μF |
Step 1: Open up the back of your guitar and locate the volume potentiometer. You will see three terminals – one input, one output, and one ground.
Step 2: Solder one end of the 100kΩ resistor to the output terminal of the volume potentiometer.
Step 3: Solder the other end of the 100kΩ resistor to the input terminal of the volume potentiometer.
Step 4: Solder one end of the 0.001μF capacitor to the output terminal of the volume potentiometer.
Step 5: Solder the other end of the 0.001μF capacitor to the middle terminal of the tone potentiometer.
Step 6: Close up the back of your guitar and enjoy your improved tone!
Benefits of Adding a Treble Bleed Circuit
Adding a treble bleed circuit to your guitar’s volume knob is a simple and cost-effective way to improve your tone. By allowing high frequencies to bypass the volume potentiometer, you can maintain a clear, bright tone even when your volume is rolled back. This is particularly important for country guitarists who rely on a clear tone to cut through the mix.
In addition to improving your tone, adding a treble bleed circuit is also a great way to learn about the inner workings of your guitar’s electronics. It’s a simple project that even beginners can tackle, and the results are immediate and noticeable.
Adding a treble bleed circuit is a simple and cost-effective way to improve your guitar’s tone. By allowing high frequencies to bypass the volume potentiometer, you can maintain a clear, bright tone even when your volume is rolled back. So why not give it a try and see for yourself how much of a difference it can make!
4. Swap Your Op-Amp
Another effective DIY pedal mod for enhancing country guitar tone is swapping out the op-amp, which is the integrated circuit responsible for amplifying the guitar signal. Choosing the right op-amp can make a noticeable difference in the overall sound of your pedals.
Benefits of Swapping Your Op-Amp:
| Benefits | Explanation |
| Better Clarity | Switching to a high-quality op-amp can eliminate muddiness and add definition to your tone. |
| Increased Headroom | A new op-amp with higher headroom can provide cleaner, more dynamic sound at higher volumes. |
| Customizable Tone | Op-amps come in different varieties, each with its unique sonic characteristics, giving you the flexibility to tailor your pedal’s tone to your liking. |
How to Swap Your Op-Amp:
1. Choose your new op-amp: There are various op-amps available, but some commonly used for guitar pedals are the LM741, TL071, and OPA2134. Do some research and choose the one that fits your needs and preferences.
2. Remove the old op-amp: Unscrew the pedal’s back panel, locate the old op-amp, and carefully remove it. Be sure to take note of its orientation before removing it.
3. Install the new op-amp: Before inserting the new op-amp, make sure it’s oriented correctly by aligning the notch or dot on the chip with the corresponding marking on the socket. Once in place, gently press down to secure it.
4. Test your pedal: Reassemble your pedal and test it out. Listen for any improvements in clarity, headroom, or tone customization options.
Remember that swapping out your op-amp is an advanced DIY pedal mod that requires some knowledge of electronics. If you’re not comfortable doing it yourself, consider seeking the help of a professional.
Advanced DIY Pedal Mods for Country Guitarists
Now that you’ve mastered the basics, it’s time to take your DIY pedal mods for country guitarists to the next level. These advanced mods require a bit more know-how, but they can unlock a world of sonic possibilities. From tone controls to bypass circuits, there are plenty of ways to customize your pedals to fit your unique sound. So, strap on your tool belt and let’s dive in!
1. Modify Your Tone Control
One of the most effective DIY pedal mods for country guitarists is modifying the tone control. By adjusting the tone control on your guitar pedal, you can boost certain frequencies and get a more defined sound. There are a few different ways to modify your tone control, including changing the type of capacitor, potentiometers or adding a tone stack.
Changing Capacitors: Capacitors are an essential component of any guitar pedal, and changing them out can make a significant difference in your sound. For country guitarists, swapping out the stock capacitors for vintage-style capacitors can help bring out the high-end sparkle and twang of your guitar. Consider using paper-in-oil capacitors, which are known for their warm, vintage sound.
Swapping Potentiometers: Another option for modifying your tone control is swapping out the potentiometers. Potentiometers, or pots, are the knobs that control the amount of effect a pedal has on your guitar’s signal. Replacing your pots can help you achieve a more precise control over your tone. For country guitarists, using audio taper pots can help you achieve a smoother and more natural-sounding roll off of your tone.
Adding a Tone Stack: A tone stack is a series of filters that allow you to control the frequency response of your guitar signal. Adding a tone stack to your pedal can help you dial in your sound even further. There are several different types of tone stacks to choose from, including the classic Fender-style tone stack or the Marshall-style stack. Depending on your personal preference and playing style, you can create a tone stack that gives your sound a unique character.
Making any of these modifications to your tone control can help you achieve a more authentic country guitar tone. Remember, it’s essential to take your time and understand the components of your pedal before making any changes. It’s also a good idea to practice your soldering skills on a scrap circuit board before attempting any modifications on your pedal to ensure you don’t cause any harm.
2. Add a Mid-Boost
One of the most popular DIY pedal mods for country guitarists is adding a mid-boost circuit to their overdrive pedals. This simple modification can do wonders for creating a signature sound that stands out in a mix.
What is a Mid-Boost?
A mid-boost is a circuit that adds gain specifically to the midrange frequencies of your guitar’s sound. This can help cut through a mix and make your solos or riffs stand out more.
Materials Needed
To add a mid-boost to your pedal, you will need the following materials:
| Material | Quantity |
|---|---|
| 0.047µF Capacitor | 1 |
| 22k Resistor | 1 |
| 10k Resistor | 1 |
| 5k Linear Potentiometer | 1 |
| Assorted Wire | N/A |
Steps to Add a Mid-Boost to Your Pedal
1. Open up your pedal and locate the “+IN” and “+OUT” points on the circuit board.
2. Solder a wire from the “+IN” point to one of the outer lugs on the 5k potentiometer.
3. Solder a wire from the “+OUT” point to the other outer lug on the 5k potentiometer.
4. Solder a wire from the middle lug on the 5k potentiometer to the “tip” lug on your guitar output jack.
5. Solder a wire from the ground lug on your guitar output jack to the circuit board ground.
6. Solder the 22k resistor from the “+” input jack to the midpoint lug on the 5k potentiometer.
7. Solder the 10k resistor from the midpoint lug on the 5k potentiometer to the circuit board ground.
8. Solder the 0.047µF capacitor from the “+” input jack to the midpoint lug on the 5k potentiometer.
9. Reassemble the pedal.
Testing Your Mid-Boost
After adding the mid-boost circuit to your pedal, it’s important to test it and make sure it’s working properly. Plug in your guitar and amp and test out the sound with the mid-boost both on and off. Adjust the potentiometer to find the sweet spot for your preferred mid-range boost. If you hear any unwanted noise or humming, make sure your soldering connections are clean and free from wires touching each other.
With a little bit of technical know-how and some patience, adding a mid-boost circuit to your overdrive pedal can be a game-changer for your country guitar tone. Give it a try and see how it can enhance your playing and boost your creativity.
3. Create a Master Volume Control
When it comes to enhancing your country guitar tone through pedal mods, one advanced technique you may want to try is creating a master volume control. This mod will allow you to better control your overall output and can help you achieve a more dynamic sound.
To create a master volume control, you’ll need a few tools, including a multimeter, soldering iron, and wire cutters/strippers. Here’s a breakdown of the process:
Step 1: Identify the output resistor in your pedal. This will typically be located near the output jack and will likely be labeled R2 or R3. Use your multimeter to determine the resistance value of this resistor.
Step 2: Determine the resistance value you’d like your master volume potentiometer to have. This will depend on your personal preferences, but a good starting point is around 100K or 250K.
Step 3: Using your wire cutters/strippers, remove the output resistor from your pedal. You’ll then need to solder wires from the corresponding spots on the circuit board to your master volume potentiometer.
Step 4: Once your wires are soldered in place, mount your potentiometer in an appropriate location on your pedal enclosure. Make sure to secure it firmly so it won’t move around during use.
Step 5: With the potentiometer installed, you can now adjust your master volume to achieve the desired output level. This will allow you to control the overall volume of your guitar without having to adjust the volume on each individual pedal.
Creating a master volume control is a more complex mod, but it can be a great way to fine-tune your tone and achieve greater control over your sound. Just make sure to approach the process with caution and take your time to ensure everything is properly installed and soldered.
4. Implement a True Bypass
One of the most important modifications you can make to your pedals as a country guitarist is implementing a true bypass. This modification is all about preserving the tone of your guitar, allowing it to shine through without being muddied or altered by your pedals when they’re turned off.
A true bypass is essentially a switch that completely removes your pedal from your signal chain when it’s turned off, rather than letting some of your guitar’s signal continue to pass through your pedal. When you’re playing through a true bypass pedal, your guitar’s signal will be completely unaltered by the pedal when it’s turned off.
Implementing a true bypass modification isn’t necessarily an easy task, but it can be well worth the effort. Here’s what you’ll need to do:
| Step | Description |
|---|---|
| Step 1 | Open up your pedal’s housing to reveal its circuit board. |
| Step 2 | Locate the wires connecting your pedal’s input and output jacks to the circuit board. |
| Step 3 | Unsolder the wires from the circuit board. |
| Step 4 | Solder a wire across the two terminals on your footswitch to create a direct connection between your input and output jacks when the pedal is turned off. |
| Step 5 | Solder wires from your input and output jacks to the appropriate terminals on your footswitch, allowing the signal to flow through your pedal when it’s turned on. |
| Step 6 | Close up your pedal’s housing and test it out to make sure your true bypass is working effectively. |
Once you’ve successfully implemented a true bypass in your pedal, you should notice a significant improvement in the clarity and dynamics of your guitar’s tone. This modification can help you maintain your personal playing style and keep your guitar’s unique sound intact, making it the perfect addition to your arsenal of DIY pedal mods.
Conclusion
As we come to the end of this article on DIY Pedal Mods for Country Guitarists, it’s hard not to feel both excited and a little overwhelmed. We’ve covered a lot of ground, from the benefits of mods to choosing the right pedals to easy and advanced modifications. But where do we go from here? How do we pull it all together into a cohesive plan for enhancing our tone? Don’t worry, we’ve got you covered with some key takeaways to keep in mind as you embark on your own pedal modding journey.
1. Embrace a DIY Mentality
To truly enhance your tone as a country guitarist, it’s important to embrace a DIY mentality. This involves being willing to put in the time, effort, and creativity required to modify your pedals and achieve your desired sound.
Why Embrace a DIY Mentality?
There are several reasons why embracing a DIY mentality can benefit country guitarists looking to enhance their tone.
| Reason #1: Cost-effective | DIY pedal mods can be a cost-effective alternative to purchasing expensive boutique pedals. By modifying your existing pedals, it’s possible to achieve similar results without breaking the bank. |
| Reason #2: Customization | With a DIY mentality, the possibilities for customization are endless. You have complete control over the modifications you make to your pedals, tailoring your tone to your specific needs and preferences. |
| Reason #3: Learning experience | Embracing a DIY mentality means taking the time to learn about the inner workings of your pedals and how different components interact with each other. This knowledge can translate to other areas of your musical and technical skills, ultimately making you a better overall musician. |
Tips for Embracing a DIY Mentality
If you’re new to DIY pedal mods, it can be intimidating to get started. Here are a few tips to help you embrace a DIY mentality and get the most out of your pedal modifications:
– Start small: It’s best to begin with simple, easy-to-execute mods like swapping out capacitors or adjusting resistors before attempting more complex modifications.
– Do your research: Before starting any modifications, make sure you have a good understanding of the specific components you’ll be working with and how they interact with each other.
– Don’t be afraid to experiment: With DIY pedal mods, there’s no one right way to do things. Don’t be afraid to try out different components and configurations to find what works best for you.
– Stay organized: When taking apart your pedals and making modifications, it’s important to stay organized and keep track of which components go where. This will make reassembly much easier.
Embracing a DIY mentality can be a rewarding and satisfying way to enhance your tone as a country guitarist. It may take some trial and error to get it right, but the end result is a sound that is uniquely yours.
2. Find Your Signature Sound
As a country guitarist, finding your signature sound is crucial to standing out in a crowded music scene. While DIY pedal mods are a great way to personalize your tone, it’s important to remember that tone is subjective and what works for one guitarist may not work for another. Here are some tips for finding your signature sound:
- Experiment: Try different pedal combinations and settings to see what works best for you. Don’t be afraid to step outside of your comfort zone and try new things.
- List to other artists: Take inspiration from other guitarists and listen carefully to how they achieve their unique sound. Analyze their playing and try to replicate it in your own way.
- Consider your playing style: Your playing style should heavily influence the tone you’re going for. If you’re a finger-picker, you may want to go for a brighter, more twangy tone. If you’re a flat-picker, you may want a warmer, more balanced tone.
- Be patient: Finding your signature sound is a journey that takes time and patience. Don’t get discouraged if it takes a while to get there.
- Be open to feedback: Play for others and ask for their input. They may hear something in your tone that you didn’t notice before.
- Embrace imperfection: Remember that your unique tone may not be perfect or polished, but that’s what makes it yours. Don’t strive for perfection, strive for authenticity.
By following these tips and experimenting with different pedal mods, you can find your signature sound and stand out as a country guitarist with a truly unique tone.
3. Enjoy the Process
When it comes to DIY pedal mods for country guitarists, the process itself is just as important as the end result. Not only is working on your own equipment a rewarding experience, but it also allows you to intimately understand and improve your tone. Here are some tips to help you enjoy the process:
- Take Your Time: Don’t rush the process of modifying your pedals. Take breaks when needed, and allow yourself to really focus on the task at hand.
- Learn as You Go: DIY pedal mods are a fantastic opportunity to learn more about electronics and how they affect your guitar’s tone. Research as you go along, and don’t be afraid to ask for help if you get stuck.
- Experiment: One of the most exciting things about modding your own pedals is the ability to experiment and create a truly unique sound. Try different components and set-ups until you find something that really speaks to you.
- Document Your Progress: Keep track of what you’re doing along the way. Take notes on the changes you make and how they affect your tone. Not only will this help you understand your equipment better, but it will also give you a record to refer back to in the future.
- Embrace the Imperfections: Remember that DIY pedal mods are a learning experience. Don’t worry too much about making everything perfect the first time around. Embrace the imperfections and use them as a jumping off point for further experimentation.
DIY pedal mods for country guitarists offer a wonderful opportunity to improve your tone and learn about electronics. While the end result is certainly important, it’s equally important to enjoy the process along the way. Take your time, experiment, and embrace the imperfections – you’ll be amazed at the final result you can achieve.
Frequently Asked Questions
1. Can pedal mods significantly improve tone?
Yes, even small changes can make a noticeable difference in tone.
2. Will modding my pedal void the warranty?
Yes, most manufacturers will not warranty a modded pedal.
3. Do I need to have extensive knowledge of electronics to mod my pedal?
No, there are many easy mods that can be done with basic knowledge and tools.
4. Can I undo a mod if I don’t like the results?
Yes, most mods can be undone fairly easily.
5. What tools do I need to mod my pedal?
Basic tools include a soldering iron, solder, wire cutters, and a multimeter.
6. Can pedal mods damage my equipment?
It’s possible, but unlikely if done correctly. Always exercise caution and double check your work.
7. Should I mod all of my pedals or just a few?
It’s up to personal preference and the desired outcome. Modding all of your pedals can be time-consuming and costly.
8. Can I find mod kits or instructions online?
Yes, there are many websites and forums dedicated to pedal mods with detailed instructions and kits available for purchase.
9. Can I mod pedals I rented or borrowed?
No, it’s not recommended to mod equipment that isn’t yours without permission from the owner.
10. Can modding pedals be a profitable side hustle?
It’s possible if you have a talent for it and market yourself effectively. However, be mindful of copyright laws and manufacturer’s policies.